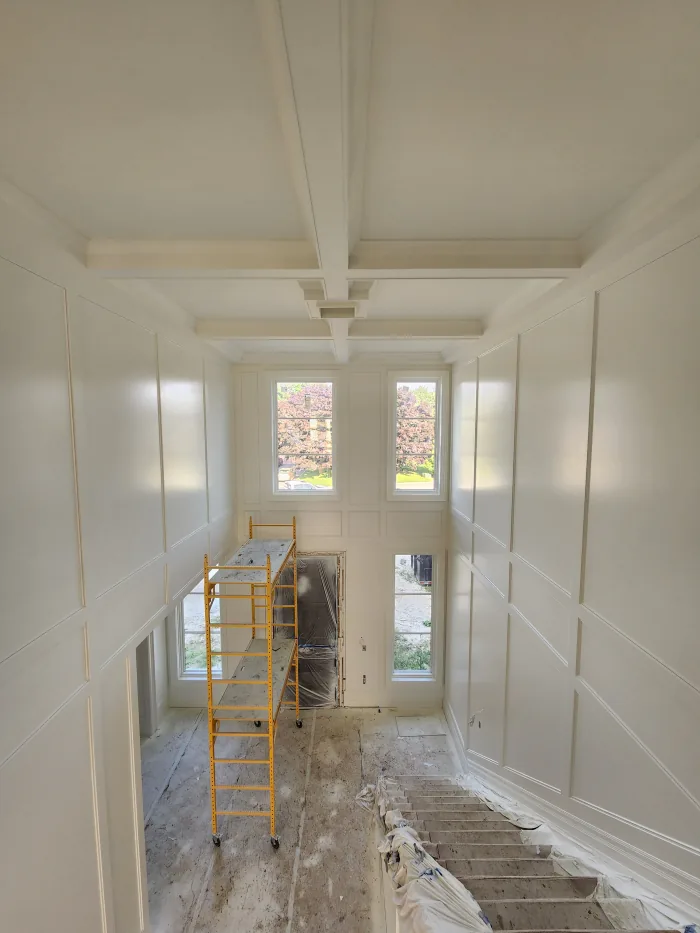
For new construction interiors, inspect and repair new drywall, prime it with a dedicated drywall primer, then paint ceilings, walls, and trim in that order. Primer first prevents blotchy color and uneven sheen because raw drywall paper and joint compound absorb paint at different rates. Timing depends on temperature, humidity, and ventilation. Getting the new construction painting process right the first time is far cheaper than fixing flashing or peeling after the fact.
TL;DR:
- Proper drywall inspection and repair, along with dust removal, are essential before applying primer to prevent uneven finish and future peeling issues.
- Using a dedicated drywall primer like PVA and applying it with spray and back-roll ensures even absorption and reduces the risk of flashing or the need for extra coats.
- Painting should follow a strict order: ceilings first, walls second, and trim last, to minimize drips and facilitate easier touch-ups.
- A full interior house typically requires one primer coat plus two finish coats, with careful attention to keeping wet edges and consistent application.
- Complete sequencing, responsible trade coordination, and coverage of all prep work are critical to avoiding costly rework and ensuring a high-quality new build interior finish.
Table of Contents
- A roadmap for painting a brand-new build
- Getting new drywall ready before a drop of paint goes on
- Why new drywall needs its own primer
- Choosing paint and tools for a uniform, durable finish
- Ceilings first, walls next, trim last
- How long paint needs to dry, cure, and clear the air
- What drives the schedule and the price
- A checklist to run before the painters arrive
- Where professional experience actually pays off
- What homeowners underestimate about coordination
- Get your new build painted right the first time
- Sources
- FAQ
A roadmap for painting a brand-new build
Painting rarely happens in isolation on a new build. It sits inside a sequence of trades, and where it falls in that sequence determines how much rework you avoid later.
Drywall finishing (taping, mudding, sanding to the specified finish level) needs to be fully complete and inspected before a painter picks up a brush. HVAC systems should be running or at least capable of controlled ventilation, since temperature and airflow affect both primer absorption and dry time. Flooring installation, especially anything requiring heavy sanding or finishing, generally happens after painting to avoid dust contamination, though final coats of trim paint sometimes wait until after floors go in to protect against scuffing.
Before booking a painting contractor, confirm a few things:
- The drywall finish level (Level 4 or Level 5) and whether skim coating is included or a separate line item.
- Whether temporary heat and ventilation will be active during the painting window.
- Which party is responsible for touch-ups caused by other trades working after paint is applied.
Scope boundaries are where most disputes happen. Some contracts include drywall repair and sanding as part of the painting scope; others treat it as a separate task billed to the drywall trade. A detailed timeline guide can help you map out when painters should start relative to cabinetry, flooring, and final trim installation.
Getting new drywall ready before a drop of paint goes on
New drywall looks finished long before it actually is. A close inspection catches problems that primer and paint will otherwise highlight rather than hide.
Walk every wall and ceiling under raking light (a work light held at a low angle) to spot nail pops, uneven joint feathering, visible corner beads, and fastener sinks that weren’t filled flush. Mark anything that needs attention with a pencil or blue tape before you start repairs.
- Fill nail pops, dents, and gouges with lightweight joint compound.
- Sand repairs flush once dry, feathering the edges so they blend into the surrounding surface.
- Re-inspect under the same raking light to confirm nothing was missed.
- Remove dust with a HEPA vacuum first, then wipe surfaces with a damp microfiber cloth or tack cloth.
Skipping the dust removal step is a common shortcut that causes primer and paint to grab unevenly, leaving a slightly gritty texture that shows under certain lighting. Sanding dust is fine enough to stay airborne for a while, so give it time to settle before wiping down, and vacuum floors and windowsills again afterward.
This is also the point to protect anything you don’t want painted. Cover flooring, light fixtures, switch plates, and cabinetry with drop cloths or plastic sheeting, and mask window and door trim if it’s a different color or finish than the walls.

Pro Tip: Run a bright work light across every wall at a low angle before you sand. Flaws invisible under normal room lighting jump out instantly under raking light.
Why new drywall needs its own primer
Raw drywall paper and dried joint compound absorb paint at noticeably different rates. Paint the two side by side without primer and you’ll see it: the compound patches look duller or shinier than the surrounding paper, a defect painters call flashing. A dedicated drywall primer seals both surfaces to a consistent porosity so the finish coat lands evenly across the whole wall, according to Behr’s product guidance for drywall primer.
Skip the primer and you risk more than cosmetic issues: uneven absorption means the finish paint has to work harder to achieve coverage, which often means an extra coat you didn’t budget for.
A few practical points on primer selection and application:
- PVA (polyvinyl acetate) primers are the standard choice for new drywall and are formulated specifically to equalize porosity.
- Read the product label for VOC content, dry time, and whether it’s rated for spray application, since formulations vary by brand.
- Professional crews typically spray the primer on, then immediately back-roll it to push primer into the surface and eliminate lap marks, a method Behr’s technical guidance recommends for consistent absorption.
- Let primer dry fully before touching it. Drywall paper fibers sometimes raise slightly as they dry, and a light sanding pass smooths them before the finish coat goes on.
- If any area has water staining, smoke exposure, or a repaired section with different material underneath, a stain-blocking primer is worth using on that section even if PVA primer covers the rest.
Primer is not a cosmetic step. It equalizes drywall absorption and prevents flashing, according to Behr’s primer guidance, which calls it the single highest-risk oversight on new builds when skipped.
Choosing paint and tools for a uniform, durable finish
The right finish depends on the room and how it gets used. Ceilings almost always take a flat or matte finish, since sheen on a ceiling exaggerates every roller mark and drywall imperfection. Most living spaces and bedrooms do well with eggshell, which balances a soft look with washability. Trim, doors, and cabinetry benefit from satin or semi-gloss, both of which hold up to cleaning and highlight crisp edges.
Tool choice matters as much as finish choice on a new build with large, uninterrupted wall surfaces. An airless sprayer followed by a back-roll gives the most even coverage on open floor plans and tall walls, and it’s dramatically faster than rolling alone across an entire home. For smaller rooms or touch-up work, a quality roller with the right nap thickness (a thicker nap for textured walls, a shorter nap for smooth drywall) does the job without the setup time a sprayer requires.
For walls in the 14 to 18 foot range that new builds increasingly feature, working in vertical bands with a lift or scaffold, keeping the wet edge moving before it starts to dry, tends to produce the most uniform result and helps the wall pass what painters call the light test, according to Clare’s guidance on painting new construction.
The light test itself is simple: shine a bright light across the wall at a low angle once the paint has dried. Flashing, roller marks, or inconsistent coverage show up immediately under that angle even though they’re invisible under normal room lighting.
A few practical rules for coat counts and technique:
- Plan for one primer coat plus two finish coats on new drywall walls and ceilings.
- Keep wet film thickness consistent. Applying too thin a coat causes lap marks where wet paint meets a drying edge.
- Work in manageable sections and maintain a wet edge rather than painting an entire wall in one uninterrupted pass.
Pro Tip: Stage large rooms by painting one full wall at a time rather than cutting in around the whole room first. It keeps the wet edge consistent and avoids visible seams where sections dried at different times.
Ceilings first, walls next, trim last
The order matters more than most homeowners expect, and it isn’t arbitrary.
- Paint ceilings first. Drips and splatter fall onto unpainted walls rather than a finished surface, and you can mask the walls’ top edge with less precision.
- Paint walls next, cutting in corners and edges by hand, then rolling the open field while the cut-in edges are still wet enough to blend without a visible line.
- Finish trim last, using satin or semi-gloss paint and a quality sash brush or fine-finish sprayer to get sharp, clean lines against the wall color.
- Do a final walk-through under raking light to catch any missed spots, thin coverage, or drips before calling the room complete.
This order also simplifies touch-ups. If a wall gets a scuff mark from another trade after painting, you’re only matching wall paint, not worrying about ceiling overspray or trim edges that were already sealed off.
How long paint needs to dry, cure, and clear the air
Dry to the touch and fully cured are two different things, and confusing them leads to premature furniture placement or trade work that dents soft paint film. Surface dry time is usually a matter of hours, but full cure, when the paint film reaches its final hardness, takes considerably longer and depends heavily on temperature, relative humidity, and how thick the coat was applied.
Ventilation during and after painting isn’t just about smell. NRC research on architectural coating emissions found that volatile organic compound emissions concentrate mainly during the drying period, which means active airflow in the hours and days right after painting matters more than ventilation later on. Open windows where weather allows, run HVAC fans if the system is active, and follow the re-entry guidance printed on the product label rather than a generic rule of thumb.
VOC content is also a regulatory matter, not just a health preference. Environment and Climate Change Canada regulates concentration limits for specified architectural coatings, and a federal discussion paper estimated that architectural coatings accounted for about 19 kilotonnes, or 4%, of VOCs from consumer and commercial products in Canada in 2018. Choosing a low or zero VOC paint matters more in a newly built, still-airtight home where occupants move in shortly after the final coat dries.
A practical rule of thumb: most interior latex paints are dry enough for light traffic within a day, but give a full week before moving in heavy furniture or hanging anything that requires drilling into a freshly painted wall. Our guidance on cutting paint fumes covers ventilation setups that work well during an active painting window.

What drives the schedule and the price
A single average-sized bedroom typically takes a painting crew a day including prep, primer, and two coats. A full new-build home, depending on square footage and layout complexity, can run anywhere from several days to a couple of weeks for a full interior.
Several variables push a quote up or down more than homeowners expect:
- Prep level. A home with extensive drywall repairs or a rougher finish level costs more to prep than one arriving prime-ready.
- Primer requirements. Stain-blocking or specialty primers for water damage or smoke exposure add cost beyond standard PVA primer.
- Paint quality and square footage. Premium paint lines and larger square footage both raise material costs directly.
- Access and protection. Vaulted ceilings requiring scaffolding or lifts, and extensive floor and fixture protection, add labor time.
A written scope that spells out prep tasks, coat counts, masking, protection, and who’s responsible for damage caused by trades working after the painters leave is the clearest way to avoid a surprise invoice. Our breakdown of new construction painting costs walks through why quotes for the same square footage can vary so widely.
A checklist to run before the painters arrive
Before any primer goes on, confirm these items with whoever is doing the work:
- Drywall finish level is complete and has passed inspection under raking light.
- Primer type matches the surface, PVA for standard new drywall, stain-blocking where needed.
- Ventilation and temporary heat will be active during the painting window.
- Trade sequencing is agreed on, especially flooring and cabinetry installation dates.
- Floors, fixtures, and cabinetry are scheduled for protection before work starts.
The most common mistake on new builds is skipping primer to save a day, which almost always costs more in touch-up labor once flashing shows up under daylight. A close second is under-protecting floors during spray priming, since overspray travels farther than rollers ever would. A scope that doesn’t mention primer, coat counts, or dust removal by name is a scope worth questioning before you sign it. Our preparation checklist is built to hand directly to a contractor for confirmation.
Pro Tip: Ask any painting quote to state the primer brand and coat count in writing. If it isn’t specified, ask why before you sign.
Where professional experience actually pays off
Most rework on new-construction paint jobs traces back to three stages: incomplete drywall inspection, skipped or rushed primer, and inconsistent masking around fixtures and floors. A professional scope addresses all three by building inspection, primer, and protection into the price rather than treating them as optional add-ons.
Professional painting companies handle new construction and multi-unit development projects with prep, primer, and cleanup included as standard rather than billed separately. Our drywall repair guidance and scheduling resources reflect the same sequencing described above, drawn from projects where getting that order right made the difference between a one-day touch-up and a full re-coat.
What homeowners underestimate about coordination
The biggest surprises on new builds rarely come from the paint itself. They come from scheduling gaps: a painter shows up before drywall inspection is signed off, or trim installers arrive before paint has cured enough to handle without marking. Asking for a written schedule that names each trade’s start date solves most of it.
Before signing any contract, confirm scope, who repairs drywall damage discovered mid-job, warranty terms, and who handles final cleanup. A short daily check-in during the painting window catches sequencing problems before they become rework.
— Enrico
Get your new build painted right the first time
Some professional painting services offer new construction interior painting that includes full drywall inspection, dedicated primer application, and site protection as standard, rather than upselling these details. Projects generally come with transparent estimates and a written workmanship warranty to clarify scope before work begins.

New construction painting services typically cover everything from single-unit builds to multi-unit developments, coordinating directly with builders and site supervisors to fit into existing trade schedules.
- Full drywall inspection and repair before any primer goes on.
- Spray-and-back-roll primer application for even absorption across every wall.
- Fixed, transparent pricing with a written workmanship warranty on every project.
Check our interior painting services for details, or use our instant quote calculator to get a fast estimate for your build.
Sources
This guide draws on Environment and Climate Change Canada’s VOC regulations for architectural coatings, NRC research on coating emissions during drying, and Behr’s technical guidance on drywall primer, alongside practical property-upgrade context from industrial property improvement research.
- Canada
- Determining coefficients for mass-transfer models for VOC emissions from architectural coatings — NRC Publications
FAQ
What are the steps involved in painting a newly constructed house?
The process starts with inspecting and repairing new drywall, followed by sanding and thorough dust removal. Next comes a dedicated drywall primer applied by spray and back-roll, then finish coats in the order of ceilings, walls, and trim.
How long before you can paint in a new build?
Painting can begin once drywall finishing is complete and has passed inspection under raking light, with active ventilation or temporary heat running. Waiting until the space is fully dried out and dust-free prevents primer and paint from grabbing unevenly.
How much should it cost to paint a 2,000 square foot house?
Cost depends heavily on prep level, paint quality, ceiling height, and how much masking and protection the job requires, so a fixed number isn’t reliable without a scope. A written estimate that lists coat counts, primer type, and protection tasks is the most reliable way to compare quotes for a home that size.
Do professional painters do trim or walls first?
Professional sequencing paints ceilings first, walls second, and trim last. Trim goes last because it uses a different sheen, satin or semi-gloss, and painting it last keeps the crisp edges from getting scuffed by wall work happening around it.