For a standard new-build interior, the sequence runs primer and ceilings first, then walls, then trim — expect several weeks of elapsed calendar time including dry windows and the trim installation gap. Luxury or custom builds should budget multiple weeks, partly because specialty finishes need longer cure windows and partly because some builders recommend waiting several months for structural settling before applying high-end topcoats. The difference between active labor and elapsed time matters here: according to ProJul’s interior finishing guide, actual paint-phase labor typically totals about a week to nearly two weeks on a standard home, but the calendar stretches to 2–3 weeks once you account for overnight dry times and the trim install window.
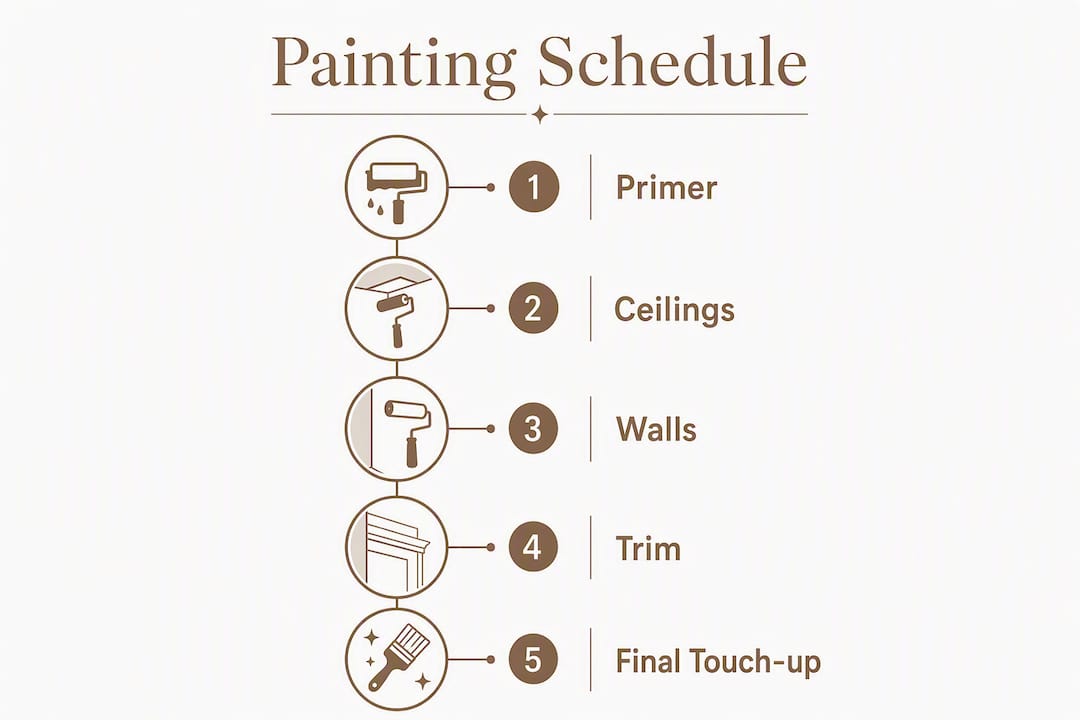
TL;DR: Prime ceilings → finish ceilings → prime walls → finish walls → trim install → caulk/spot-prime → trim paint → final touch-ups. Lock five milestone dates with your GC before paint starts.
Five milestone dates to lock with your GC:
- Site walk with painter, GC, and lead carpenter (color zones, staging areas, protection plan)
- Primer start date (drywall complete, HVAC operational, windows installed)
- First finish coats (ceilings and walls, after primer fully cured)
- Trim installation window (painter clears the space; trim crew enters)
- Final punch-list pass (after all trades complete, contracted separately)
Table of Contents
- When should you start painting a new build?
- What’s the step-by-step interior painting sequence?
- When can exterior painting safely begin?
- How do you coordinate painting with the GC and other trades?
- How do primer and paint choices affect your schedule?
- Sample day-by-day schedules for small, average, and luxury builds
- What are the red flags of a rushed paint schedule?
- How should the final walkthrough and punch list work?
- Pro tips from experienced new-construction painters
- Key Takeaways
- The tradeoff nobody talks about in new-build paint schedules
- Sigma Painting handles new-build scheduling so you don’t have to
- Useful sources
When should you start painting a new build?
Painting before the site is ready is one of the most expensive mistakes in new construction. Primer applied over damp drywall, or finish coats laid down while heavy trades are still cutting and grinding nearby, will fail. The prerequisites are non-negotiable.
Hard prerequisites before primer:
- Drywall is fully taped, mudded, sanded, and signed off by the GC
- The building envelope is weather-tight: windows and exterior doors installed, roofing complete, no open penetrations
- HVAC is operational and has been running for at least 48 hours to stabilize temperature and humidity
- Floors are either not yet installed or protected with rosin paper and tape
- Electrical rough-in is complete; fixtures are either installed and masked or not yet hung
Dust removal after drywall sanding is a critical pre-primer step that many schedules underestimate. A HEPA vacuum pass followed by tack cloths across every surface is not optional — sanding dust left on walls causes adhesion failures that show up as peeling within months.
Temperature and humidity are equally important. TightLine Constructions recommends keeping ambient conditions between 50°F and 85°F throughout the painting phase, with moderate humidity. Paint applied outside that range cures unevenly, and the defects often don’t appear until the homeowner has already moved in.
Temperature and humidity window: 50°F–85°F ambient, moderate humidity. Require HVAC stabilization for 48 hours before finish coats begin.
Pro Tip: Never rely on visual inspection to confirm drywall is dry enough for primer. Use a moisture meter. A surface that looks and feels dry can still hold enough trapped moisture to cause primer failure, especially in bathrooms and exterior walls.
Site sign-offs the painter should get before priming:
- Written GC sign-off that drywall finishing is complete
- Confirmation that HVAC is operational and set to maintain the paintable temperature range
- Windows and exterior doors installed and sealed
- Confirmation that no wet trades (concrete, tile setting, plaster) are active in the painting zone
When any of these conditions are missing, delay the primer start. Rescheduling a day costs far less than a full repaint.
What’s the step-by-step interior painting sequence?
The interior painting sequence for new construction follows a strict logic: work top to bottom, and always finish surfaces before the next trade installs anything that will touch them. Here is the full ordered sequence with realistic time estimates.
- Pre-primer dust removal and surface prep (half day to 1 day): HEPA vacuum all surfaces, tack-cloth walls and ceilings, spot-sand any drywall ridges or tool marks. This step is often skipped under schedule pressure and almost always causes problems.
- Prime ceilings (1 day for a standard home): Apply one coat of drywall primer to all ceilings. Spray application is fastest; rolling is acceptable for smaller areas.
- Prime walls (1–2 days): Full prime coat on all walls. Spraying and back-rolling gives the most uniform coverage.
- Touch-up sand and spot prime (half day): After primer dries overnight, sand any raised grain or nibs, spot-prime bare patches. This step is what separates a professional finish from a builder-grade one.
- First finish coat, ceilings (1 day): Apply the first topcoat to ceilings. Minimum 2–4 hours before recoat; overnight preferred.
- Second finish coat, ceilings (1 day): Final ceiling coat. Allow to cure before any overhead work.
- First finish coat, walls (1–2 days): Roll or spray walls room by room. ProJul’s guide notes this phase typically runs 1–2 days of labor on a standard home.
- Second finish coat, walls (1–2 days): Final wall color. Minimum 2–4 hours between coats; overnight is the professional standard.
- Trim and millwork installation (GC/carpenter, 2–5 days): Painter clears the space. Trim crew installs baseboards, casing, crown, and doors. This window is where most scheduling conflicts happen.
- Caulk all seams and spot-prime trim (half day): After trim is set, caulk every joint between trim and wall. Spot-prime any bare wood or MDF exposed during installation.
- Trim paint, first coat (1–2 days): Apply first coat to all trim, doors, and millwork. Semi-gloss or satin for most applications; high-gloss for formal spaces.
- Trim paint, second coat (1–2 days): Final trim coat. Allow full cure before flooring or cabinetry crews return.
- Final wall touch-ups and punch-list (1–2 days): Address scuffs, dings, and missed spots from the trim install. This pass is contracted separately from the main scope.
Recoat intervals: The 2–4 hour minimum applies to waterborne latex under ideal conditions. In cooler temperatures (below 60°F) or higher humidity, extend that to 6–8 hours minimum, with overnight strongly preferred. Alkyd trim paints need longer: typically 24 hours between coats.
Spraying vs. rolling: Spray application cuts labor time significantly on large open areas but requires masking everything that isn’t being painted. On a new build where floors aren’t installed yet, spraying ceilings and walls is efficient. Once flooring is staged or installed, rolling becomes the safer choice to avoid overspray damage.

Pre-finishing trim off-site: Doors and some millwork can be pre-painted in a shop before installation. This removes trim painting from the critical path and allows the on-site crew to focus on walls and ceilings. The tradeoff is that installation scuffs will still need touch-up on-site, so budget a half-day touch-up pass regardless.
| Phase | Active Labor | Minimum Dry Time | Preferred Dry Time |
|---|---|---|---|
| Primer (ceilings + walls) | 2–3 days | 4 hours | Overnight |
| Touch-up sand + spot prime | Half day | 2 hours | 4 hours |
| Finish coats, ceilings (×2) | 2 days | 2–4 hours | Overnight |
| Finish coats, walls (×2) | 2–4 days | 2–4 hours | Overnight |
| Trim install (GC/carpenter) | 2–5 days | N/A | N/A |
| Caulk + spot prime trim | Half day | 1 hour | 2 hours |
| Trim paint (×2) | 2–4 days | 4–24 hours | Overnight/24 hrs |
| Final touch-ups + punch | 1–2 days | N/A | N/A |
Pro Tip: Order 10–15% more paint than your coverage calculation suggests and label every can by color zone and room. Touch-up paint mixed months later rarely matches perfectly. Having labeled leftovers from the original batch saves arguments at the punch-list.
When can exterior painting safely begin?
The rule is simple: exterior painting starts only after the building envelope is weather-tight. Pedigree Painting’s guidance on new construction timelines is direct on this point: paint applied before the envelope is complete risks adhesion failures because substrates haven’t had time to dry and cure properly.
Weather-tight means sheathing complete, windows and doors installed and flashed, roofing finished, and all exterior penetrations sealed. It does not mean “mostly done.”
Exterior prep steps before painting:
- Confirm all siding, trim boards, and fascia are installed and any manufacturer-required acclimation period has passed
- Back-prime raw cedar, pine, or any absorbent wood siding before installation where possible; if not done pre-install, prime immediately after
- Caulk all seams, butt joints, and penetrations after the structure has had time to settle (typically 2–4 weeks after framing is complete)
- Clean all surfaces: remove construction dust, mill glaze on fiber cement, and any efflorescence on masonry
- Confirm substrate moisture is within acceptable range using a moisture meter
Weather checklist for exterior painting:
- Temperature between 50°F and 90°F during application and for at least 24 hours after
- No rain forecast for 24–48 hours after application
- Low wind (under 15 mph) to prevent dust contamination and uneven drying
- Avoid painting in direct, intense sunlight on hot surfaces — paint dries too fast and lap marks become permanent
- No frost expected overnight following application
Material-specific notes:
Vinyl siding generally requires no primer but must be clean and dry; painting it a darker color than the original requires a paint formulated for vinyl to prevent warping. Fiber cement siding (such as HardiePlank) must be primed within the manufacturer’s specified window after installation, often 180 days, and the primer coat is critical for long-term adhesion. Raw wood siding needs a full prime coat within days of installation to prevent moisture absorption and checking.
Pro Tip: Schedule exterior painting in the morning when surfaces are cool and dew has fully evaporated. Afternoon heat on south-facing walls causes paint to skin over before it fully levels, leaving a rough texture that’s visible in raking light.
For weather-window planning and exterior scheduling in the GTA, Sigma Painting’s exterior services page covers substrate-specific prep and seasonal scheduling considerations.
How do you coordinate painting with the GC and other trades?
Painting is the trade that touches everything last, which means every delay upstream lands on the paint schedule. Getting coordination right requires locking dates early and asking the right questions before crews mobilize.

The ideal sequence relative to other trades:
Painting happens after drywall finishing and before final flooring installation and cabinetry. That’s the window. Final touch-ups happen after trim, flooring, and cabinetry are complete, because those trades will scuff walls and ding corners. Scheduling the touch-up pass before those trades finish is money wasted.
Builder-focused painting services consistently emphasize pre-construction site walks with the GC to lock milestone dates, color zones, and specialty finishes before paint is purchased or crews are scheduled. That walk is where conflicts get caught before they become delays.
Trade milestones painting depends on:
- HVAC operational and maintaining temperature/humidity (required before primer)
- Electrical rough-in complete; fixtures either installed and masked or staged off-site
- Plumbing rough-in complete; no active wet work in painting zones
- Flooring either not yet installed or fully protected with rosin paper and tape
- Cabinetry staged but not installed (paint walls and ceilings first, then cabinets go in)
- Stair stringers installed if stair painting is in scope; stair finishing timing affects the sequence when staining is involved
Questions to ask the GC when requesting paint start dates:
- Is HVAC operational and set to maintain 50°F–85°F in all painting zones?
- Which areas will still need heavy trade access during the painting phase?
- Has drywall finishing been signed off, and is the dust remediation complete?
- Are windows and exterior doors installed and sealed?
- What is the trim installation date, and how many days will the trim crew need?
- When is flooring scheduled to arrive, and will it be staged in painting zones?
- Is there a confirmed date for cabinetry installation?
Pro Tip: Schedule a joint site walk with the GC, lead carpenter, and your painting foreman at least one week before primer start. Walk every room, confirm color zones, identify areas that need extra protection, and agree on staging locations for ladders and equipment. This one meeting prevents most mid-project conflicts.
Coordination checklist (copy into your GC email or meeting agenda):
- [ ] Drywall sign-off confirmed in writing
- [ ] HVAC operational for 48 hours before primer start
- [ ] Windows and exterior doors installed
- [ ] Electrical fixtures installed/masked or staged off-site
- [ ] Flooring protected or not yet installed
- [ ] Trim installation date locked
- [ ] Cabinetry installation date locked
- [ ] Final touch-up pass date contracted separately
- [ ] Color zones and sample boards approved
- [ ] Staging areas for ladders and equipment confirmed
For builders and developers managing multiple units, Sigma Painting’s builder and developer program includes dedicated project management and pre-construction planning to keep painting milestones on the master schedule.
Understanding how painting fits into the broader construction sequence is covered well in this home renovation phases guide, which maps painting milestones against framing, mechanical, and finish phases.
How do primer and paint choices affect your schedule?
The products you choose determine how long you wait between coats. That’s not a minor detail on a new-build schedule where every extra day of dry time can push the trim crew back.
Primer and topcoat chemistry:
Waterborne latex primers are the standard for new-construction drywall. They dry to touch in 1–2 hours and can be recoated in 4 hours under good conditions. They’re low-odor, easy to clean up, and compatible with virtually every topcoat. High-build primers, used when drywall finishing quality is inconsistent, need longer dry windows: typically 6–8 hours before sanding and recoating.
Alkyd (oil-based) primers offer better stain blocking and are preferred for knotty wood trim and doors. The tradeoff is a 24-hour recoat window and stronger odor, which requires ventilation. Waterborne alkyd hybrids split the difference: better flow and leveling than latex, with a 4–6 hour recoat window.
Application method and schedule impact:
| Product Category | Recoat Window | Best Application | Schedule Impact |
|---|---|---|---|
| Interior waterborne latex primer | 4 hours | Spray + back-roll | Fastest; allows same-day second coat |
| High-build drywall primer | 6–8 hours | Spray + back-roll | Adds half day per coat |
| Waterborne alkyd trim paint | 4–6 hours | Brush/roll | Moderate; two coats in one day possible |
| Alkyd (oil-based) trim paint | 24 hours | Brush | Slow; one coat per day maximum |
| Low-VOC interior topcoat | 2–4 hours | Spray or roll | Similar to standard latex |
Spraying large open areas (ceilings, walls before flooring) cuts labor by 30–50% compared to rolling, but requires masking everything in the space. On a new build with no flooring installed, spraying ceilings and walls is the most efficient approach. Once flooring is down or staged, the masking time often erases the speed advantage.
Dust control and tools that protect the schedule:
A HEPA vacuum is non-negotiable before primer. Construction dust is fine enough to embed in primer and create a rough texture that telegraphs through every topcoat. Running a HEPA vacuum followed by tack cloths adds a few hours but prevents a full reprime. For pre-finished doors, a small spray booth or a clean staging area away from active construction keeps finish quality high and avoids contamination.
Pro Tip: Label every paint can with the color name, room zone, and application date before it leaves the staging area. When touch-up paint is needed six months after move-in, the homeowner will thank you. A simple masking tape label on the lid takes ten seconds.
For decisions about interior door color and finish timing, pre-finishing doors off-site in a controlled environment consistently produces better results than painting them after installation.
Sample day-by-day schedules for small, average, and luxury builds
These templates are starting points. Adjust for crew size, application method, and environmental controls. All elapsed times assume a two-person crew under good conditions (50°F–85°F, moderate humidity, HVAC operational).
Small build: about a small to medium-sized home
- Day 1: HEPA dust removal, surface prep, spot-sand drywall. Prime all ceilings and walls (spray).
- Day 2: Touch-up sand primer, spot-prime bare patches. First finish coat, ceilings.
- Day 3: Second finish coat, ceilings. First finish coat, walls.
- Day 4: Second finish coat, walls. Allow overnight cure.
- Days 5–7: Trim installation (GC/carpenter). Painter off-site or on other zones.
- Day 8: Caulk all trim seams, spot-prime bare wood. First coat, trim and doors.
- Day 9: Second coat, trim and doors. Allow 24-hour cure for alkyd; 4–6 hours for waterborne alkyd.
- Day 10: Final wall touch-ups, punch-list items. Job complete.
Total elapsed time: 10–12 days. Active labor: 7–8 days.
Average build: a mid-sized home
Phase the work by floor or color zone to keep dry windows from stalling the whole crew.
- Days 1–2: Full dust removal and surface prep. Prime all ceilings and walls, main floor first, then upper floor.
- Days 3–4: Touch-up sand, spot prime. First and second finish coats, ceilings (both floors).
- Days 5–7: First and second finish coats, walls. Phase by color zone: neutrals first, accent walls last.
- Days 8–12: Trim installation window (GC/carpenter). Painter pre-finishes doors off-site if possible.
- Days 13–14: Caulk, spot-prime trim. First and second coats, all trim and doors.
- Days 15–16: Final touch-ups after trim install. Punch-list walk with GC.
Total elapsed time: 16–18 days (roughly 2.5 weeks). Active labor: 10–12 days.
Luxury/custom build: a larger home with specialty finishes
Custom and luxury new homes face a different set of timing decisions. Some builders recommend waiting several months for structural settling before applying high-end finishes. When the schedule doesn’t allow that wait, budget extra days for specialty work and accept that a touch-up pass at 6–12 months may be needed.
- Days 1–3: Full prep, dust removal, moisture meter checks on all substrates. Prime ceilings and walls.
- Days 4–5: Touch-up sand, spot prime. High-build primer on any imperfect drywall areas.
- Days 6–8: First and second finish coats, ceilings. Extra day for high-ceiling spaces and coffered details.
- Days 9–13: First and second finish coats, walls. Specialty finishes (venetian plaster, limewash, board-and-batten details) add 2–4 days.
- Days 14–20: Trim installation window. Pre-finished doors and millwork arrive from shop.
- Days 21–25: Caulk, spot prime, first and second coats on all trim. High-gloss or lacquer finishes need 24-hour windows between coats.
- Days 26–28: Final touch-ups, punch-list walk, documentation.
Total elapsed time: 4–6 weeks. Active labor: 18–22 days.
Adaptation notes:
- Adding a third crew member cuts labor days by roughly 25–30% but doesn’t compress dry times.
- Spray application on open floors saves 1–2 days on the prime and first-coat phases.
- Controlled environment (heated and dehumidified space in winter) keeps the schedule on track when outdoor temperatures drop below 50°F.
- Overlapping color zones safely: you can paint Zone A walls while Zone B ceilings cure, but never apply finish coats in a room where trim installation is still active.
What are the red flags of a rushed paint schedule?
Schedule compression is the most common source of paint failures in new construction. Knowing what to look for mid-project lets you intervene before a small problem becomes a full repaint.
Common problems when schedules are rushed:
- Insufficient dry time between coats: The finish coat traps solvent from the primer, causing bubbling, peeling, or a soft film that dents under light pressure.
- Moisture entrapment: Primer applied over damp drywall or green lumber seals moisture in, which eventually pushes the paint off the surface.
- Flashing and uneven sheen: Inconsistent dry times across a wall cause some areas to absorb differently, leaving visible sheen variations that worsen in raking light.
- Overspray on finished surfaces: Spraying trim after walls are finished without adequate masking leaves a fine texture on wall paint that’s nearly impossible to remove cleanly.
- Trim scuffing after finish coats: Allowing the trim crew back into a freshly painted space before walls have fully cured guarantees scuffs that require a full touch-up pass.
Red flags to watch for on-site:
- Primer that feels tacky or soft to the touch after the stated dry time (moisture or temperature problem)
- Sanding dust still visible on surfaces before primer is applied
- HVAC not running or set below 50°F in painting zones
- Overspray visible on window glass, hardware, or finished floors
- Trim installation happening in rooms where finish coats were applied less than 24 hours ago
Steps to take when you spot a red flag:
Ask the contractor to pause that phase and identify the cause before continuing. A one-day pause to resolve a moisture issue costs far less than repainting a room after move-in. For overspray on finished surfaces, the fix depends on timing: fresh overspray can be wiped with a damp cloth; cured overspray requires sanding and recoating.
Mid-project quality checklist (homeowner or GC):
- [ ] Primer is fully dry and not tacky before finish coats begin
- [ ] No sanding dust visible on primed surfaces
- [ ] HVAC maintaining 50°F–85°F in all active zones
- [ ] No overspray on floors, glass, or hardware
- [ ] Trim crew not entering freshly painted rooms until walls are fully cured
- [ ] Color zones match approved sample boards
Pro Tip: The final touch-up pass is not a luxury — it’s the difference between a clean closeout and an open-ended warranty dispute. Leaving a contracted touch-up window after all trades are complete prevents small scuffs from becoming large repaints. Budget 1–2 days for it and write it into the contract explicitly.
How should the final walkthrough and punch list work?
The final walkthrough is where the painting scope closes. Without a clear acceptance protocol, touch-ups become an open-ended obligation that drags on for months after the homeowner moves in.
Acceptance checklist for the final walkthrough:
- [ ] Sheen is uniform across each wall and ceiling surface (no flashing or lap marks)
- [ ] All caulk seams between trim and walls are filled, smooth, and painted
- [ ] Door and trim finishes are consistent in sheen and coverage, including back edges of doors
- [ ] Paint edges at floor thresholds are clean and straight
- [ ] All corrected drywall defects (nail pops, cracks, corner bead damage) are primed and painted
- [ ] No visible brush marks, roller texture inconsistencies, or drips
- [ ] Hardware, glass, and floors are free of paint and overspray
- [ ] Color zones match the approved sample boards
Typical punch-list items and who fixes them:
- Scuffs on walls from trim installation (painter): touch-up with original color, feathered to blend
- Missed fastener holes in trim (painter): fill, prime, and paint
- Thin spots near windows or corners (painter): additional coat on affected area
- Caulk gaps that opened after settling (painter): recaulk and touch-up paint
- Paint on hardware or glass (painter or GC, depending on contract): scrape and clean
- Drywall cracks from settling (GC/drywaller first, then painter): repair drywall, prime, paint
Best practice for contracting the final touch-up pass:
Write the final touch-up pass as a separate line item in the painting contract. Specify the trigger (all trades complete, flooring installed, cabinetry installed), the response window (typically 5–10 business days after notification), and the acceptance criteria (the walkthrough checklist above). This prevents the touch-up pass from becoming an indefinite obligation and gives both parties a clear definition of “done.”
Warranty questions to ask your painting contractor:
- What is the warranty period for workmanship defects?
- Does the warranty cover touch-ups needed after settling (nail pops, hairline cracks)?
- What is the process for requesting warranty work, and what is the response time?
- Is touch-up paint included, and will it be stored on-site or with the contractor?
Document the punch-list with photos and location tags (room name, wall, height) before the touch-up pass begins. A shared photo log eliminates disputes about whether an item was pre-existing or caused by the painting crew.
Pro tips from experienced new-construction painters
These are the details that separate a smooth new-build paint schedule from one that generates callbacks.
Before paint arrives on-site:
- Walk every room with the GC and lead carpenter to lock color zones, confirm sample board approvals, and identify staging areas for ladders and equipment. Do this at least one week before primer start.
- Confirm moisture meter readings on all drywall and wood substrates. A reading above 12% on drywall is a stop-work condition.
- Verify HVAC has been running for 48 hours and is maintaining the target temperature range in every zone.
During the painting phase:
- When spraying trim on-site, either mask walls heavily before spraying or accept minor overspray and sand it out before applying wall finish coats. Never spray trim after walls are finished without full masking.
- Keep a dedicated touch-up kit (small brush, stir stick, labeled paint cans by zone) staged near the exit of each completed room. Minor scuffs caught the same day take two minutes to fix; the same scuff found at the final walkthrough takes twenty.
- Run a HEPA vacuum in any room where sanding or cutting happened the previous day before applying the next coat.
At handover:
- Provide the homeowner with a labeled set of touch-up cans organized by room and color zone.
- Walk the completed job with the GC and homeowner together, not separately, so punch-list items are agreed on in real time.
- Require HVAC to remain operational for at least 72 hours after the final coat before the space is closed up for move-in.
Key Takeaways
A reliable new build painting schedule runs primer and ceilings first, then walls, then trim, with a separately contracted final touch-up pass after all trades are complete, totaling about 2–3 weeks elapsed (16–18 days) for a standard home and 4–6 weeks for luxury builds. Active labor typically totals 7–12 days for a standard home and 18–22 days for luxury builds.
| Point | Details |
|---|---|
| Sequence is non-negotiable | Prime ceilings first, then walls, then trim; final touch-ups only after all trades are done. |
| Elapsed time vs. labor time | A standard home needs about 2–3 weeks on the calendar, with 7–12 days of active paint labor; luxury builds run 4–6 weeks elapsed, with 18–22 days of labor. |
| HVAC before finish coats | Require HVAC operational for 48 hours before any finish coat; 50°F–85°F is the paintable range. |
| Contract the punch-list pass | Write the final touch-up pass as a separate line item with a trigger date and response window. |
| Sigma Painting for new builds | Sigma Painting offers pre-construction site walks, milestone scheduling, and a final punch-list pass for new-build projects in the GTA. |
The tradeoff nobody talks about in new-build paint schedules
The conventional wisdom on new-build painting is to move fast: get the paint on, hand over the keys, close the job. Every GC wants to hit the closing date, and painting is usually the last trade in the sequence, which means it absorbs every upstream delay. The pressure to compress the paint schedule is real and constant.
Here’s the problem with that logic: paint failures from rushed schedules don’t show up at closing. They show up six months later, when the homeowner notices peeling trim, flashing on accent walls, or nail pops that were painted over instead of repaired. By then, the warranty conversation is contentious and the repaint costs more than the time saved.
The compressions that are genuinely acceptable are well-defined. Pre-finishing doors and millwork off-site removes trim painting from the critical path without sacrificing quality. Phasing work by floor or color zone lets a crew keep moving while other zones cure. Spraying ceilings and walls on open floors cuts labor days without cutting dry time.
The compressions that aren’t acceptable are equally clear: skipping the overnight recoat window to apply a second coat the same afternoon, priming over damp drywall because the moisture meter wasn’t checked, and most of all, not contracting a final touch-up pass after all trades are complete. That last one is where most new-build paint jobs quietly fail. The first finish looks fine at closing. Then the flooring crew, the appliance delivery, and the cabinet installers all leave their marks, and there’s no contracted mechanism to address them.
The contract tip that matters most: write the final touch-up pass as a separate line item with a specific trigger (all trades complete), a response window (five to ten business days), and an acceptance checklist. Both parties sign it. That one clause prevents more disputes than any warranty language ever written.
Sigma Painting handles new-build scheduling so you don’t have to
New-build painting is a different job than repainting an occupied home. The sequencing, the trade coordination, the milestone scheduling, and the final punch-list management all require a contractor who understands how construction programs work, not just how to roll a wall.

Sigma Painting works directly with GCs, developers, and owner-builders across the GTA on new construction projects of every scale. The process starts with a pre-construction site walk to lock color zones, confirm milestone dates, and identify any substrate or environmental issues before paint is ordered. From there, a dedicated project manager coordinates with the GC to keep painting milestones on the master schedule, manage trade handoffs, and protect finished surfaces during remaining construction activity.
For interior new-construction painting, Sigma Painting’s scope includes primer, finish coats, trim and millwork painting, and a separately contracted final touch-up pass after all trades are complete. For larger multi-unit developments, the commercial painting program scales crews and phases work across units to hit closing dates without compromising finish quality.
Get a project estimate and schedule input with Sigma Painting’s instant quote calculator, or reach out directly to discuss your build timeline.
Useful sources
- Interior Finishing Guide: Drywall, Paint & Trim for Contractors (ProJul) — Detailed phase-by-phase breakdown of interior finishing timelines, including day estimates for primer, finish coats, and trim; the most practical contractor-facing resource in this list.
- New Construction Painting: A Complete Guide (TightLine Constructions) — Covers temperature and humidity requirements, recoat intervals, and the full new-build sequence; useful for setting environmental standards.
- New Construction Painting (Z&Z Painting) — Builder-account model with pre-construction site walks and priority scheduling; good reference for understanding how professional builder programs work.
- Painting for Custom New Homes (GreenHaus Painting) — Addresses the luxury build timing question, including the 3–12 month settling debate and specialty finish considerations.
- Surrey New Construction Painting Timeline (Pedigree Painting) — Practical exterior timing guidance covering weather-tight prerequisites and substrate readiness.
- How to Paint a New Construction Home (Parnell Painting) — Strong on pre-primer prep: HEPA vacuuming, tack cloths, and dust remediation steps that most guides skip.
- New-Build Home Decorating Tips (Bellway) — Homeowner-facing perspective on waiting periods and settling; useful for understanding the gap between trade schedules and homeowner expectations. Note: UK market source.
- Interior Painting / Finishing Schedule for New Construction (Reddit r/Construction) — Real-world contractor discussion on sequencing and scheduling conflicts; useful for understanding common field problems.
- Sigma Painting — For Builders & Developers — Sigma Painting’s builder program page covering site walks, milestone scheduling, and GTA new-construction painting services.