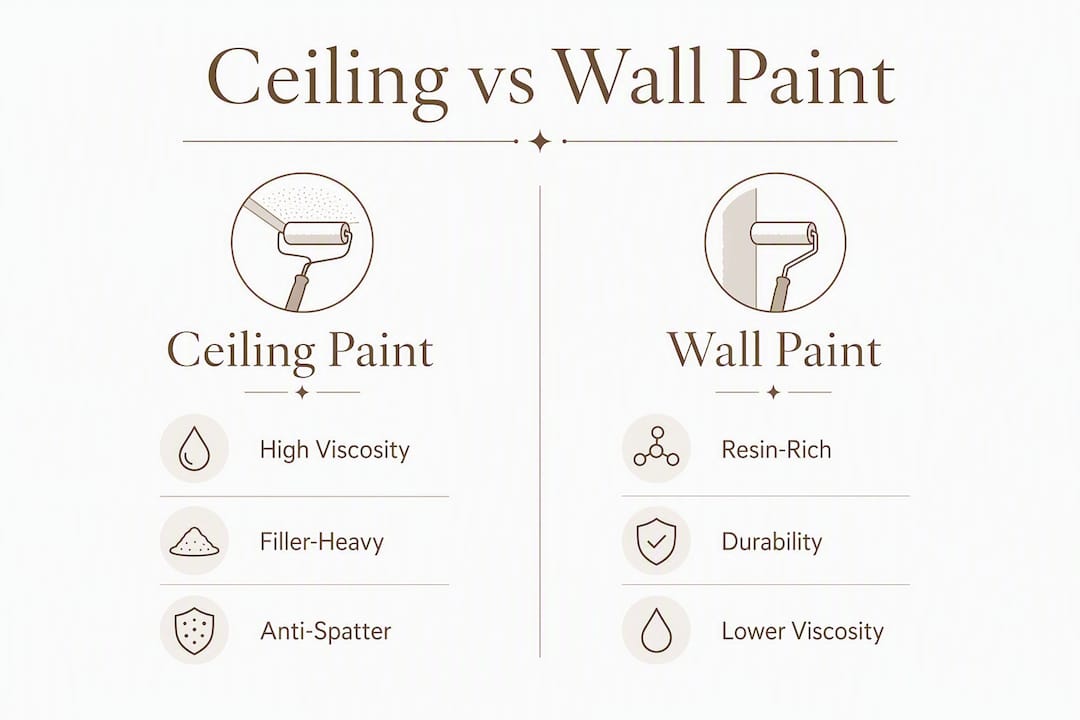
Ceiling paint and wall paint are formulated for different jobs, and using each where it belongs saves you rework, wasted product, and a finish you’ll regret. Ceiling paint is thicker, dries flat, and resists dripping overhead. Wall paint is resin-rich, comes in a range of sheens, and holds up to scrubbing. The short rule: use ceiling paint on ceilings and wall paint on walls for any room you actually care about.
Three differences drive that rule:
- Viscosity and drip control. Ceiling paint is specifically formulated with higher viscosity to minimize spatter and dripping during overhead application. Wall paint is thinner and will run if you roll it above your head.
- Sheen. Ceiling paint is almost always flat or ultra-matte. Wall paint spans matte, eggshell, satin, and semi-gloss. Flat hides imperfections; shinier sheens clean more easily.
- Durability and cleanability. Wall paint is built for abrasion and repeated wiping. Ceiling paint trades scrub resistance for better coverage and light diffusion.
Brands like Benjamin Moore, Sherwin-Williams, and Behr all publish separate ceiling and wall product lines for exactly these reasons.
Table of Contents
- 1. How ceiling paint and wall paint differ in formulation
- 2. How ceiling and wall paints behave during application
- 3. Can you use wall paint on a ceiling, or ceiling paint on walls?
- 4. Which sheen should you choose for ceilings vs. walls?
- 5. Coverage, hiding power, and how to handle ceiling imperfections
- 6. How much paint, time, and money to plan for
- 7. Professional sequence: paint ceilings first, then walls
- 8. Pro tips and trade observations for a better ceiling finish
- Key Takeaways
- The finish you get is decided before you open the can
- Useful sources and technical references
1. How ceiling paint and wall paint differ in formulation
Ceiling paint is a high-viscosity, filler-heavy formula, while wall paint is resin-rich to enhance durability. That single distinction cascades into several practical differences.
The fillers in ceiling paint do two things: they thicken the product so it clings to the roller and releases slowly overhead, and they build opacity quickly so you cover taped joints and minor bumps in fewer passes. Wall paint skips those fillers in favor of resins that bond tightly to vertical surfaces and resist scuffs.
Anti-spatter additives are another ceiling-specific ingredient. They reduce the fine mist that a loaded roller throws when you push it across a ceiling, which matters a lot when you’re working over furniture or finished floors.
Most ceiling paints are white or off-white and designed to maximize light reflection and perceived room height. Color options exist but are limited compared to wall paint lines. The flat finish diffuses light evenly, which is why even low-gloss wall paint can reveal roller marks and patched seams on a ceiling under raking light — a decisive reason to use the right product in visible rooms.
Key formulation trade-offs at a glance:
- Higher viscosity in ceiling paint = fewer drips, more controlled application
- Filler-heavy formula = better single-coat hiding on white or off-white ceilings
- Flat/ultra-matte sheen = hides imperfections, diffuses light
- Lower resin content = lower scrub resistance than wall paint
- Resin-rich wall paint = durable, cleanable, available in multiple sheens
Pro Tip: If you’re shopping for ceiling paint and the label doesn’t say “ceiling” anywhere, check the viscosity spec on the datasheet. A product with a Stormer viscosity above 105–115 KU is formulated for overhead work. Anything thinner will drip.
2. How ceiling and wall paints behave during application
Rolling paint overhead is physically different from rolling a wall, and the formulation reflects that. Here’s what changes in practice.

1. Roller nap selection matters more than most DIYers realize. For smooth drywall ceilings, use a 3/8-inch nap roller cover. Textured or popcorn ceilings need a 1/2-inch nap or thicker so the cover reaches into the valleys without skipping. Using the wrong nap leaves uneven coverage that no second coat will fully fix.
2. Load the roller correctly. An overloaded roller is the number-one cause of ceiling drips. Roll out excess paint on the tray ramp until the cover is evenly saturated but not dripping. Ceiling paint’s higher viscosity gives you more margin, but it won’t save a soaking-wet roller.
3. Work in consistent passes and maintain a wet edge. Ceiling paint formulations often offer longer open time, which helps you avoid lap marks during large overhead passes. Work in 3–4 foot sections, always rolling back into the wet edge before it skins over.
4. Spraying vs. rolling. Spraying is faster on large ceilings but requires back-rolling to work the paint into the surface. Ceiling paint’s thicker body atomizes differently than wall paint — you may need to thin it slightly per the manufacturer’s spec, and overspray risk increases in tight rooms. Rolling is the right call for most DIY jobs.
5. Ladder and body positioning. Poor ladder placement forces awkward angles that cause uneven roller pressure and banding. Position the ladder so your arm reaches the ceiling at roughly a 45-degree angle, and move the ladder rather than stretching.
Pro Tip: Cut in the ceiling perimeter with a brush before rolling. Do it while the ceiling paint is still wet so the rolled section blends into the brushed edge. Cutting in and then waiting too long before rolling creates a visible line.
3. Can you use wall paint on a ceiling, or ceiling paint on walls?
The short answer: you can, but you usually shouldn’t, and the room type determines how much it matters.
Wall paint on a ceiling: Wall paint’s lower viscosity leads to more dripping and may emphasize ceiling flaws under reflected light. Using wall paint on ceilings often requires more coats or rework compared to a purpose-made ceiling product. In a utility room or garage where appearance is secondary, it’s a reasonable shortcut. In a living room or bedroom, the drip risk and sheen mismatch make it a poor trade.
Ceiling paint on walls: Ceiling paint’s flat finish and low scrub resistance make it a poor choice for any wall that gets touched, wiped, or exposed to moisture. It will mark, scuff, and stain faster than any wall paint at the same price point.
When substitution is acceptable:
- Small closets with no natural light
- Garages and utility rooms
- Storage areas where cleaning is never a concern
- A single accent wall where you want an ultra-flat, matte look and accept the lower durability
When substitution is a mistake:
- Living rooms, dining rooms, and bedrooms (visible ceiling, walls get touched)
- Kitchens and bathrooms (moisture, grease, and frequent cleaning demand wall-specific formulations)
- Children’s rooms (walls need to survive scrubbing)
- Any room with raking natural light that will expose roller marks
One common temptation: you want the ceiling and walls to match in color, so you use the same wall paint for both. The color match works, but you’ll fight drips the entire time you’re painting overhead, and the sheen on the ceiling will look different from the walls under most lighting. A better approach is to have the ceiling paint tinted to match the wall color.
4. Which sheen should you choose for ceilings vs. walls?
Ceiling paint dries to a flat or ultra-matte finish to maximize light diffusion and hide ceiling imperfections, while wall paints span a wide sheen range. The right sheen for walls depends on the room’s function.

| Room | Ceiling sheen | Wall sheen | Notes |
|---|---|---|---|
| Living room | Flat | Eggshell | Eggshell cleans easily, hides minor wall flaws |
| Bedroom | Flat | Eggshell or matte | Low traffic; matte works if you don’t wipe walls often |
| Kitchen | Flat | Satin or semi-gloss | Grease and moisture demand a wipeable surface |
| Bathroom | Flat | Satin or semi-gloss | Humidity resistance is the priority |
| Hallway | Flat | Satin | High-contact surface; satin holds up to scuffs |
| Home office | Flat | Eggshell | Moderate traffic; eggshell balances durability and appearance |
A few notes on colored ceilings: Benjamin Moore’s guidance points out that a rich navy or deep black ceiling can blur the boundaries of a room and create an intimate feel. When you go with a colored ceiling, the flat sheen still applies, but you’ll likely need two coats because deep pigments require more build. Tint the primer to a mid-tone of the finish color to reduce the number of topcoats.
Sheen also interacts with how your interior doors and trim read in the room. A flat ceiling with semi-gloss trim creates a clean contrast that draws the eye to architectural detail rather than the ceiling plane.
Pro Tip: Before committing to a sheen on your walls, paint a 2x2 foot test patch and check it under your room’s actual lighting at different times of day. A satin that looks perfect in the paint store can look almost glossy in a south-facing room with afternoon sun.
5. Coverage, hiding power, and how to handle ceiling imperfections
Ceiling paint often covers in a single coat on white or off-white ceilings. Wall paints commonly need two coats, especially over dark colors or bare drywall. That difference matters when you’re estimating materials and time.
When you must prime before painting:
- Water stains or smoke damage (use a shellac-based or oil-based stain-blocking primer)
- Fresh joint compound patches (porous compound will flash through paint without primer)
- Drastic color change, especially going from dark to light
- New drywall that has never been painted
- Any surface with glossy paint that needs to be dulled for adhesion
Preparation workflow for ceilings:
- Patch all cracks, holes, and popped nails with joint compound
- Sand smooth once dry, feathering the edges
- Wipe down with a damp cloth to remove dust
- Apply stain-blocking primer to any stained or patched areas
- Roll ceiling paint in consistent passes, maintaining a wet edge
Dutch Boy’s DuraClean ceiling solution uses a color-changing formula that applies pink and dries white, giving you a visual confirmation of full coverage in low-light overhead conditions. It’s a practical tool on large ceilings or in rooms with poor natural light during the workday.
Pro Tip: On a ceiling with multiple patched areas, spot-prime every patch individually before the full coat. Rolling primer over the entire ceiling wastes product and time. Spot-priming seals the porous patches so the finish coat lays down evenly across the whole surface.
6. How much paint, time, and money to plan for
A standard 10x10 room ceiling is about 100 square feet. Most ceiling paints cover a moderate area per gallon, enough for that ceiling with some margin. The four walls of the same room total roughly 320 square feet (assuming 8-foot ceilings, minus doors and windows), which typically requires sufficient wall paint for one or two coats.
| Surface | Room size | Gallons needed | Coats | Est. DIY hours | Rough material cost |
|---|---|---|---|---|---|
| Ceiling | 10x10 | 1 gal | 1–2 | 1.5–2 hrs | $25–$35 |
| Walls | 10x10 | 1–2 gal | 2 | 3–4 hrs | — |
Cost per gallon varies by quality tier. Entry-level ceiling paints run $25–$35 per gallon. Mid-range products from Behr or Sherwin-Williams land around $40–$55. Premium lines from Benjamin Moore sit at $60–$75 or higher. Wall paints follow a similar range, though premium lines with higher resin content cost more.
Timeline bullets for a single room:
- Prep (patching, sanding, taping): 1–2 hours
- Ceiling coat 1: 45–60 minutes application, 1–2 hours dry time before recoat
- Ceiling coat 2 (if needed): 45 minutes
- Wall coat 1: 1–1.5 hours application, 2–4 hours dry time
- Wall coat 2: 1–1.5 hours
- Realistic weekend schedule: A 10x10 room is a solid one-day project if you start early. Two coats on walls plus one on the ceiling, with proper dry time between, takes 6–8 hours total.
For larger rooms, high ceilings, or complex prep work, the math changes quickly. A professional crew can complete what takes a DIYer a full weekend in a single morning, partly because of equipment and partly because of product knowledge.
7. Professional sequence: paint ceilings first, then walls
Painting ceilings before walls reduces rework because any drips or roller spatter from the ceiling work will land on unpainted walls and get covered when you paint them. It’s the standard sequence for a reason.
Step-by-step sequence for a typical interior room:
- Paint the ceiling — Cut in the perimeter with a brush, then roll in consistent passes. Let dry fully.
The logic behind this order: ceiling drips land on walls, not on finished paint. Wall paint applied after the ceiling covers any overspray or edge bleed from step 3. Trim goes last because it’s the most precise work and benefits from having clean, dry walls as a reference.
Pro Tip: If you’re working alone, cut in the entire ceiling perimeter before loading the roller. The cut-in edge stays wet long enough to blend with the rolled section if you move efficiently. With an assistant, one person cuts in while the other rolls — you’ll finish a ceiling in half the time.
8. Pro tips and trade observations for a better ceiling finish
These are the details that separate a ceiling that looks professionally done from one that reveals every lap mark under afternoon light.
Roller selection by substrate:
- 3/8-inch nap for smooth drywall ceilings; 1/2-inch or thicker for textured or popcorn surfaces
- A thicker nap on smooth drywall leaves too much texture in the finish
- A thin nap on a textured ceiling skips the valleys and leaves bare spots
Coverage verification:
Color-changing ceiling paints, like Dutch Boy’s DuraClean, let you see exactly where you’ve rolled and where you’ve missed. On a large ceiling under artificial light, it’s easy to miss a strip without realizing it. The pink-to-white shift removes that guesswork.
Test before you commit:
Paint a 2x2 foot area in the actual room under your real lighting conditions. Check it after it dries fully, not while it’s still wet. Wet paint always looks more uniform than dry paint, and a sheen that looks fine wet can show roller texture once it cures.
Brand-level product selection:
Behr’s PREMIUM PLUS Interior Ceiling Flat Paint and Primer is spatter-resistant and maintains the original acoustical properties of the ceiling surface. Sherwin-Williams and Benjamin Moore both publish technical datasheets for their ceiling lines that specify viscosity, coverage rate, and open time. Those datasheets are worth reading before you buy, especially if you’re working on a textured ceiling or a room with a history of water damage.
For readers who want to see how premium brands compare side by side, Sigma Painting’s Benjamin Moore vs Sherwin-Williams comparison covers the practical differences from a professional applicator’s perspective.
VOC considerations:
The EPA classifies volatile organic compounds as gases emitted from certain solids or liquids, including paints. Ceiling work puts you directly under the wet surface, which increases inhalation exposure compared to painting walls. Choose a low-VOC or zero-VOC ceiling paint for any occupied home, and ventilate the room thoroughly during and after application.
Key Takeaways
Ceiling paint and wall paint are engineered for different surfaces, and using each correctly is the single biggest factor in getting a clean, durable interior finish.
| Point | Details |
|---|---|
| Use purpose-made products | Ceiling paint on ceilings, wall paint on walls — substitutions cause drips, sheen mismatches, or durability failures. |
| Match sheen to room function | Flat ceilings in every room; eggshell or satin walls in living areas; semi-gloss walls in kitchens and bathrooms. |
| Prime before you paint | Patches, stains, and new drywall all need primer — skipping it causes visible flashing in the finish coat. |
| Paint ceilings before walls | Ceiling drips land on unpainted walls; this sequence eliminates most touch-up work. |
| Know when to call a pro | High ceilings, water-damaged surfaces, or large multi-room projects are faster and cleaner with professional help. |
The finish you get is decided before you open the can
Most ceiling problems I see come down to one of two things: the wrong product or the wrong sequence. A homeowner grabs whatever paint is on hand, rolls it overhead, and then spends the next weekend fixing drips and lap marks that a purpose-made ceiling formula would have avoided entirely.
The formulation differences between ceiling and wall paint aren’t marketing. Viscosity, open time, filler content, and sheen all exist because overhead application is physically different from painting a vertical surface. Treating them as interchangeable is the kind of shortcut that creates more work, not less.
That said, the sequence matters just as much as the product. Ceiling first, walls second, trim last. It’s not complicated, but skipping steps or reversing the order turns a one-day project into a two-day correction.
For rooms with high ceilings, water stains, or significant prep work, the honest answer is that professional application pays for itself in time and finish quality. The prep alone on a damaged ceiling can take longer than painting the entire room if you haven’t done it before. Sigma Painting’s interior painting services cover product selection, prep, and application as a single package, which is worth considering when the job is bigger than a single room or the ceiling has a history.
Useful sources and technical references
A short list of manufacturer datasheets, trade resources, and Sigma Painting pages that back the claims in this article and let you dig deeper.
Manufacturer technical bulletins and product pages:
- Behr PREMIUM PLUS Interior Ceiling Flat Paint and Primer — product datasheet covering spatter resistance, sheen, and substrate compatibility
- Benjamin Moore — How to Paint a Ceiling — application guidance and color selection from the manufacturer
- Dutch Boy DuraClean Ceiling Solution — color-changing coverage-check product datasheet
- Purdy — How to Choose a Paint Roller Cover — roller nap selection guide by substrate type
Trade and industry references:
- Angi — Ceiling vs Wall Paint — coverage expectations and substitution trade-offs
- EPA — What Are Volatile Organic Compounds? — VOC definitions and indoor air quality context
Sigma Painting resources:
- Interior painting services in the GTA — full-service interior painting, product selection, and prep
- Premium paint suppliers — brands and product lines Sigma Painting uses on residential and commercial projects
- Benjamin Moore vs Sherwin-Williams comparison — practical brand-level guidance from a professional applicator’s perspective