You can repaint a retail store without closing it. The answer is yes, and the conditions are straightforward: phased or after-hours scheduling, low-VOC paint, and solid protection for your merchandise and fixtures. Miss any one of those three, and you’re looking at customer complaints, damaged inventory, or a crew that can’t finish because your shelves are in the way.
Before you call a contractor, run through this quick decision checklist:
- Can you identify off-peak hours or days? Even two to four hours of low-traffic time per day is enough to run a zone.
- Is your merchandise movable or coverable? Fixed displays need zip-wall barriers; movable product needs a staging area.
- Do you have a point of contact available during work hours? Someone must be reachable for approvals and access.
- Are you prepared to phase the work by zone? A single-zone pilot night tells you more than any contractor promise.
- Have you confirmed the contractor uses low-VOC or zero-VOC products? This is non-negotiable if customers will be present the next morning.
If you checked all five, you’re ready to plan. If not, address the gaps before signing anything.
Key Takeaways
A retail store repaint succeeds or fails based on three decisions made before the first brush touches the wall: scheduling, paint selection, and protection protocol.
| Point | Details |
|---|---|
| Schedule around your traffic data | Use POS hourly data to identify low-traffic windows; overnight crews handle the rest. |
| Specify low-VOC paint in writing | Zero-VOC or low-VOC formulas let customers return the next morning without odor complaints. |
| Run a pilot zone first | One overnight test run reveals access, timing, and prep issues before they compound. |
| Vet contractors on retail experience | Ask for photos of active retail projects, WCB certificates, and a written punch-list timeline. |
| Sigma Painting for managed repaints | Sigma Painting offers after-hours scheduling, color consultation, and photo reporting for GTA retail locations. |
Table of Contents
- How retail store repainting fits into your operations plan
- Which paints and finishes work best for an occupied retail space
- How to protect merchandise, fixtures, and flooring during a repaint
- What to look for when hiring a commercial painting contractor for retail
- The retail repaint process from first call to final walkthrough
- How color choices affect customer behavior and product visibility
- What drives the cost of a retail repaint and how long it takes
- A real-world example: overnight retail repaint with zero disruption
- What Sigma Painting prioritizes on every retail repaint
- Sigma Painting handles the entire retail repaint so you don’t have to
- Sources
How retail store repainting fits into your operations plan
Timing a repaint around your store’s rhythm is the single biggest lever you have. Most retail spaces have predictable dead zones: early weekday mornings, Sunday evenings, the slow weeks after a major sales event. Those windows are your scheduling currency.
Start by mapping your traffic data. If your POS system tracks hourly transactions, pull a 30-day average and identify the three lowest-traffic windows each week. Those become your primary work windows. For stores with no slow season, overnight crews (typically 10 PM to 6 AM) are the standard solution, and reputable commercial contractors build after-hours capability into their retail service model specifically for this reason.
For owners managing a single large location, a phased zone approach works like this:
- Identify zones by revenue and visibility priority. Start with back-of-house or low-revenue corners. Save the entry, cashwrap, and primary display walls for last.
- Run a pilot zone first. One overnight run on a storage room or staff corridor reveals real friction: access issues, HVAC noise, lighting gaps, and how long prep actually takes versus the estimate.
- Build a scheduling playbook. Document access windows, the on-site point of contact, delivery coordination rules (no stock deliveries during active painting), and customer-facing signage placement.
- Sequence by wave. Move from back to front, low-visibility to high-visibility, so the store always has a clean, presentable face for customers even mid-project.
- Lock in a change-order approval rule. Agree in writing that any scope change over a set dollar threshold requires your sign-off before work continues.
For owners with multiple locations, treating the rollout as a program rather than a series of independent jobs is what separates on-time completions from cascading delays. That means a single set of paint standards, a pilot location before the full wave, and a change log that tracks deviations across sites.
Pro Tip: Run the pilot zone on a night when you or a trusted manager can be present for at least the first hour. You’ll catch access problems, lighting issues, and prep-time miscalculations before they compound across the full project.
Which paints and finishes work best for an occupied retail space
Low-VOC and zero-VOC formulas are the baseline requirement for any store staying open during repainting. The practical difference: low-VOC products (typically under 50 g/L for walls) produce noticeably less odor than conventional paints, while zero-VOC formulas (under 5 g/L) are close to odorless once applied. Both dry faster than oil-based alternatives, which matters when your crew has a six-hour window before staff arrive.
Finish selection by zone:
- High-traffic walls and feature walls: Satin or eggshell. Washable, holds color well, and doesn’t show scuffs the way flat finishes do.
- Cashwrap and service counters: Semi-gloss. The higher sheen survives repeated cleaning and contact better than any lower finish.
- Bathrooms and break rooms: Semi-gloss or gloss on walls, gloss on trim. Moisture resistance is the priority.
- Ceilings: Flat white or flat tinted. Sheen on ceilings amplifies imperfections and light glare.
- Trim, doors, and baseboards: Semi-gloss or gloss. Durability and cleanability over aesthetics.
Color matching deserves more attention than most owners give it. If your brand has a specified paint color (a Pantone reference, a Benjamin Moore or Sherwin-Williams formula code), provide that to your contractor in writing before the project starts. Ask for a large sample panel, at least 12 by 12 inches, applied to the actual wall substrate and viewed under your store’s lighting. Fluorescent, LED, and natural light all shift color perception significantly, and a color that looks right on a chip can read differently at scale.
Pro Tip: Specify quick-dry formulas for any zone that needs two coats in a single overnight window. Some waterborne alkyd hybrids offer oil-like hardness with latex dry times, which is useful for high-contact trim work.
How to protect merchandise, fixtures, and flooring during a repaint
Protection is where most retail repaints either succeed or create expensive problems. The goal is a clean boundary between the work zone and the live retail floor, maintained throughout every shift.
Standard protection protocol:
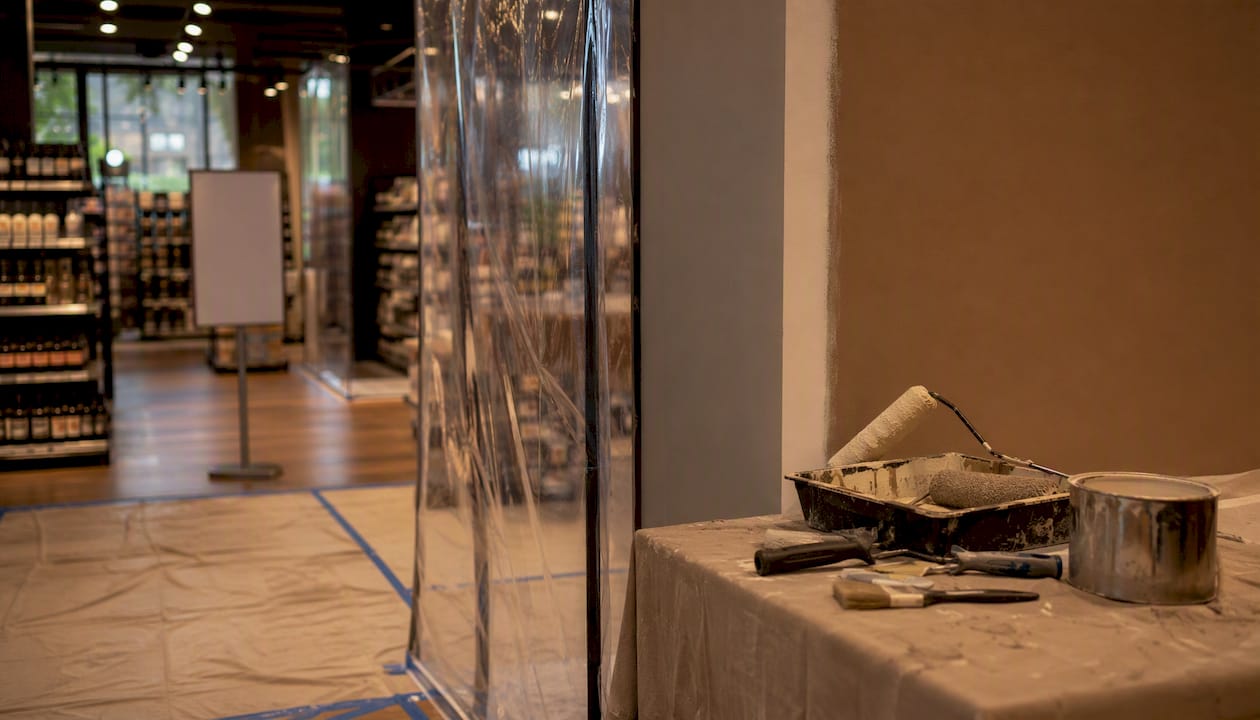
- Zip walls and poly barriers create a sealed boundary between active painting zones and open sales floor. They contain dust and overspray and give customers a clear visual cue that work is contained.
- Canvas drop cloths on flooring (not plastic sheeting, which is slippery and tears) protect hard floors and carpet from drips and foot traffic from the crew.
- Plastic sheeting over fixtures and display cases should be taped at the base, not draped loosely. Loose sheeting catches paint mist and can shift during work.
- Temporary relocation of movable merchandise to a staging area or back room is faster and safer than trying to paint around it.
- Sealed HVAC vents during sanding and prep prevent dust from circulating through the store’s air system. Use tape and poly over every vent in the active zone.
For dust specifically: sanding old surfaces generates fine particulate that travels farther than most people expect. A HEPA air scrubber running in the work zone during and after sanding captures airborne particles before they settle on product. This is standard practice for professional crews and worth confirming with any contractor you hire.
Pro Tip: Place branded temporary signage at the work zone boundary. Something like “Fresh new look coming soon — we’re open!” reduces customer hesitation and turns the repaint into a positive brand moment rather than a disruption signal.
What to look for when hiring a commercial painting contractor for retail
Not every painting contractor is equipped for retail work. The skill set for an occupied commercial space is different from residential or empty-building commercial jobs. Here’s what to verify before signing:
- Proof of liability insurance and WCB (Workers’ Compensation Board) coverage. Ask for certificates, not verbal confirmation. In Ontario, WCB coverage is a legal requirement for contractors working on commercial sites.
- Documented retail experience. Ask for photos of active retail projects, not just finished spaces. You want to see how they manage protection, signage, and customer-facing zones mid-project.
- After-hours capability. Can they staff overnight or weekend crews? What’s the premium, and is it itemized in the bid?
- Low-VOC product specification. Will they commit in writing to using low-VOC or zero-VOC products throughout the project?
- Color-matching process. How do they handle brand color specifications? Do they provide sample panels before full application?
- Warranty and punch-list timeline. What’s covered, for how long, and how quickly do they return for touch-ups after sign-off?
Red flags worth walking away from: a contractor who gives vague answers about scheduling (“we’ll figure it out as we go”), can’t produce references from retail clients, or pushes back on low-VOC product requirements. Commercial contractors who specialize in retail typically have documented workflows for exactly these scenarios.
When reading bids, look for scope clarity. A good bid names the zones, the number of coats, the specific products, and the access windows. A bid that says “paint interior walls” with a single line item is a scope dispute waiting to happen.
The retail repaint process from first call to final walkthrough
Here’s the typical sequence, and what you should sign off on at each stage:
- Consultation and measurement. The contractor walks the space, measures square footage, notes substrate conditions (cracks, stains, previous coatings), and identifies access constraints. You should receive a written scope from this visit.
- Color sign-off and schedule confirmation. You approve the paint products, colors, and finish selections in writing. The work schedule, including access windows and zone sequence, is locked in.
- Surface preparation and repairs. Filling cracks, sanding rough areas, priming bare or stained surfaces. This is the step most owners underestimate. Good prep is what separates a finish that lasts three years from one that lasts eight.
- Protection and masking. Zip walls, drop cloths, vent sealing, fixture covering. This happens at the start of each work session, not once at the beginning of the project.
- Priming and painting. Applied by zone, in the agreed sequence. Professional crews use a combination of spray application for large wall areas and brush-and-roll for edges, trim, and detail work.
- Touch-ups, inspection, and sign-off. A final walkthrough with you present. Document any deficiencies with photos and agree on a punch-list completion date before the crew leaves.
The most common execution issue is unexpected substrate damage: water stains, previous paint that’s peeling, or drywall repairs that weren’t visible during the initial walkthrough. A well-run contractor flags these immediately, photographs them, and gets your approval before proceeding. That approval process should be written into the contract.
How color choices affect customer behavior and product visibility
Color in a retail space is a merchandising decision, not just an aesthetic one. Research on color psychology in marketing shows that hue, saturation, and contrast all influence where customers look, how long they stay, and how they perceive the value of what’s on the shelf.
Practical rules that hold across most retail categories:
- Neutral backgrounds in product zones. Warm whites, soft grays, and greige tones let merchandise read clearly without competing for attention. High-saturation wall colors behind product displays tend to flatten contrast and make items harder to distinguish.
- Brand accent colors at focal points. Entry walls, the cashwrap, and signage areas are where a brand color lands with impact. Used sparingly, a saturated accent reads as intentional and premium. Used everywhere, it becomes visual noise.
- Contrast drives attention. A dark accent wall behind a light-colored product display pulls the eye. A light wall behind dark merchandise does the same. The contrast, not the color itself, is what directs customer attention.
Category examples: a boutique clothing store typically benefits from a warm neutral palette with one or two accent walls in a brand color, which creates a sense of curation. An electronics retailer often uses cool grays and whites to signal precision and modernity. A specialty food or grocery concept tends toward warm earth tones that suggest freshness and quality.
Color psychology research also supports the idea that perceived price point shifts with environment. A well-chosen palette can make the same product feel more premium without changing the product at all.
For current palette trends, Sigma Painting’s paint color trends guide covers what’s working in commercial and residential spaces in 2026, which is useful if you’re refreshing a brand look alongside the repaint.
Pro Tip: Before committing to a final color, have your contractor apply large sample panels, at least 24 by 24 inches, directly on the wall and leave them up for 48 hours. View them at different times of day and under your store’s actual lighting. What looks right at noon under natural light can read completely differently under evening fluorescents.
What drives the cost of a retail repaint and how long it takes
Cost in a retail repaint is driven by a handful of variables, and understanding them helps you read bids accurately and budget contingency correctly.
Primary cost drivers:
- Square footage and ceiling height. More surface area means more material and labor time. High ceilings require scaffolding or extension equipment, which adds cost.
- Number of colors and accent treatments. Each color change adds masking time. A two-tone scheme with a feature wall costs more than a single-color repaint of the same space.
- Substrate condition. Significant repairs (water damage, cracked drywall, peeling previous coatings) add both material and labor cost. Budget a small contingency to cover substrate surprises.
- After-hours staffing premium. Overnight and weekend crews typically carry a rate premium over standard daytime work. That premium is worth it to stay open, but it should be itemized in the bid so you can see exactly what you’re paying for.
- Specialty finishes. Textured coatings, metallic accents, or high-gloss feature walls require additional prep and application time.
Typical timelines: a small retail refresh covering one or two zones runs one to three days with after-hours execution. A full interior repaint of a mid-size store often takes several days phased across overnight shifts. A single-weekend block works for smaller spaces where you can close Saturday night and reopen Monday morning.
Use Sigma Painting’s quote calculator to get a quick budget range before requesting formal bids. It won’t replace a site visit, but it gives you a number to pressure-test contractor quotes against.
A real-world example: overnight retail repaint with zero disruption
A mid-size specialty retailer needed a full interior refresh without losing a single trading day. The store ran seven days a week with no natural closure window.
The approach: a pilot night on the stockroom and staff corridor confirmed that the crew could complete prep, prime, and two coats in a six-hour window. That data shaped the full project schedule. The main floor was divided into four zones, each painted on consecutive overnight shifts. Low-VOC waterborne paint was specified throughout, with semi-gloss on high-contact walls and satin on primary display areas. HEPA air scrubbers ran during and after each sanding session. Zip walls separated active zones from the live sales floor every night.
The store opened on time every morning. No customer complaints about odor. No merchandise damage. The punch list from the final walkthrough was closed within 48 hours.
Contractor checklist items that made it work:
- Written zone sequence and nightly access schedule agreed before day one
- Low-VOC product specification confirmed in the contract
- HEPA air scrubbers on-site for every sanding session
- Daily photo log sent to the store manager each morning
- Punch-list timeline committed in writing at sign-off
What Sigma Painting prioritizes on every retail repaint
The most common mistake I see retail owners make is treating the repaint as a maintenance task rather than a brand investment. The walls of your store are the first thing a customer reads before they look at a single product. A fresh, well-executed finish signals care and quality. A patchy or odor-laden repaint signals the opposite, regardless of how good your merchandise is.
From my perspective, three things matter most: protecting the customer experience during the work, getting the color right the first time, and using finishes that hold up to real retail traffic. A beautiful finish that scuffs after two months of shopping carts and cleaning sprays is a waste of the investment.
Sigma Painting’s interior painting services include complimentary color consultation and careful surface preparation as standard, not as add-ons. For retail clients, after-hours scheduling and photo reporting are part of how the project is managed. If you want to see what a finished commercial project looks like before committing, the King City repaint portfolio is a useful reference point.
The short version: if operational risk is your primary concern, hire a professional team with documented retail experience. The cost of a disrupted trading day almost always exceeds the cost of doing the job right.
Sigma Painting handles the entire retail repaint so you don’t have to
Retail owners who want a managed, low-disruption repaint without coordinating every detail themselves get exactly that with Sigma Painting’s commercial painting services. One point of contact manages the schedule, the crew, the protection protocol, and the punch list from first site visit to final sign-off.

The service includes after-hours and weekend scheduling, low-VOC product specification, complimentary color consultation, daily photo reporting, and a documented warranty process. You don’t chase the crew for updates; they come to you. For GTA retail locations ready to refresh without closing, the next step is a site visit and a written quote. Request yours here or use the instant quote calculator to get a ballpark before the call.
Sources
- Color psychology in marketing