

If your exterior paint is peeling, the fix is always the same sequence: figure out where the moisture is coming from, scrape off every bit of loose paint, prime any bare wood you exposed, then apply two full coats of 100% acrylic exterior latex. Skip the moisture diagnosis and you’ll be back here in two summers. Skip the primer and you’ll watch new paint lift right off the old failure.
Before you touch a scraper, run these checks:
- Tape a 12-inch square of clear plastic sheeting over a suspect area, seal the edges, and leave it for 24 hours — condensation on the wall-facing side means moisture is migrating through the wall, a test the National Research Council of Canada recommends for exactly this reason.
- Look for the obvious culprit first: gutter overflow, missing caulk, or a downspout dumping water against the siding.
- Cover any exposed bare wood with a tarp if rain is coming. Untreated wood swells and grays fast.
- Do not paint over peeling paint. It looks fine for a season, then pulls the new coat down with it.
If the tape or plastic test shows active water intrusion behind the wall, or you find soft, spongy wood when you press on it, stop and call a professional. Rot and structural moisture aren’t weekend projects, and if your home was built before 1978, don’t sand or scrape until you’ve read the lead-paint precautions below.
Key Takeaways
Fixing peeling exterior paint permanently requires diagnosing the moisture source, removing all loose paint, priming bare wood correctly, and applying two coats of 100% acrylic latex.
| Point | Details |
|---|---|
| Diagnose before you scrape | Run the 12-inch plastic-sheet test and a tape-pull test to confirm whether moisture or adhesion is the real cause. |
| Remove every bit of loose paint | Never repaint over peeling sections; feather edges through 80, 120, and 220-grit sandpaper. |
| Prime all bare wood | Use oil-based primer for tannin-rich woods or shellac-based primer like Zinsser BIN for heavy staining. |
| Stick to two coats of acrylic latex | Apply within 50°F to 85°F and 40% to 70% humidity for a proper film bond. |
| Know your safety limits | Test for lead paint on pre-1978 homes and call a certified professional if results come back positive. |
| Call a pro for structural issues | Sigma Painting offers exterior inspections covering moisture testing, substrate evaluation, and written repair estimates across the GTA. |
Where to Learn More
A few sources back the diagnostic tests and product recommendations covered here, and each is worth a closer look if you want more depth on a specific step.
- Sherwin-Williams’ exterior paint peeling guide covers manufacturer-backed causes and fixes, including caulk, gutters, and ventilation.
- This Old House’s breakdown of paint chemistry explains why oil and latex behave differently and why layering them incorrectly causes failures.
- Purdue Extension’s NCR-133 repainting procedures lays out the tape-adhesion test and step-by-step repainting sequence.
- FixUpFirst’s peeling paint repair guide offers a practical prep-prime-repaint walkthrough with specific tool recommendations.
- E&R Cleaning Solutions’ guide to paint peeling on storefronts adds useful cleaning and prep detail for commercial-style exteriors.
Table of Contents
- What Causes Exterior Paint to Peel?
- How Do You Test for Moisture Behind Peeling Paint?
- What Tools and Materials Do You Need?
- Step-by-Step Sequence to Fix Peeling Exterior Paint
- When Should You Strip Everything or Call a Pro?
- How Do You Prevent Peeling from Coming Back?
- What Does the Research Say About Painting Conditions and Prep?
- When Is It Worth Calling in a Professional Painter?
- Sources
What Causes Exterior Paint to Peel?
Peeling almost always traces back to one of five things: trapped moisture, poor surface prep, incompatible paint layers, bad application conditions, or a coating that’s simply worn out. Matching the pattern you see to the cause saves you from redoing the same section next year.
- Moisture intrusion shows up as large, sheet-like peeling, often in one concentrated area rather than scattered across the wall.
- Poor prep or chalking looks like fine, powdery paint that flakes off in small chips when you rub it, usually across broad, sun-exposed surfaces.
- Incompatible coatings, like latex applied over oil paint that hadn’t fully cured, tend to peel in larger, brittle-edged sections that come off almost like a decal.
- Bad painting conditions (too hot, too cold, or painted right before rain) cause blistering and peeling within weeks or months, not years.
- Age and UV fatigue produce cracking and alligatoring before peeling, concentrated on south and west-facing walls.
The location tells you a lot. Peeling that starts at the top edge of a wall and spreads downward almost always points to a gutter or roofline leak. Peeling clustered near a bathroom or kitchen exhaust vent usually means interior humidity is pushing through the wall from the inside, not the outside. Sherwin-Williams points to cracked caulk, clogged gutters, and poor bathroom or dryer venting as the three most common moisture sources behind this kind of failure.
There’s also a chemistry angle worth understanding before you pick a topcoat. Oil-based (alkyd) paint cures through oxidation and gets more brittle every year, while latex cures by coalescing into a flexible film that moves with the wood. Layer latex over an oil coat that hasn’t fully cured, or over old oil paint that’s already gone brittle, and you’re setting up the next peeling cycle, according to This Old House.
How Do You Test for Moisture Behind Peeling Paint?
Run two tests before you commit to a repair plan: the plastic-sheet test for wall moisture, and a tape-pull test for adhesion. Together they tell you whether you’re dealing with a moisture problem, a bonding problem, or both.
- Plastic-sheet test. Tape a 12-inch square of clear plastic tightly over a peeling area, sealing all four edges. Leave it for 24 hours. Condensation forming on the side facing the wall means moisture is passing through the substrate, and no amount of scraping and repainting will fix that until the water source is gone.
- Tape-pull adhesion test. Clean a small patch, let it dry for a couple of days, then press on a strip of tape and pull it off. If it comes away clean, the paint is bonded fine. If it lifts paint down to bare wood, you’re looking at intercoat or substrate failure, a quick diagnostic method Purdue Extension recommends before any repainting job.
- Walk the perimeter. Check caulk at every window and trim joint, inspect gutters for sagging or overflow, look at dryer and bathroom vent terminations, and confirm siding isn’t touching soil or mulch beds.
Pro Tip: Grab a pair of binoculars before you grab a ladder. Scan the roofline under the gutters, the north-facing wall, and the gable ends from the ground first. Most moisture damage starts exactly where you’d never think to climb up and check.
What Tools and Materials Do You Need?
You don’t need a contractor’s trailer for most spot repairs, but a few specific items separate a lasting fix from a repeat job.
Tools: a rigid paint scraper, a random-orbit sander with 80 and 120-grit discs plus a finer 220-grit for final feathering, a pressure washer capable of 1,200 to 1,500 PSI, a caulking gun, quality brushes and rollers, drop cloths, and a stable ladder.
For severe staining or tannin bleed on woods like cedar and redwood, a shellac-based product such as Zinsser BIN blocks bleed-through far better than a standard primer.
Safety first, always: if your home was built before 1978, assume lead paint is possible until tested. Wear a properly rated respirator, safety glasses, and gloves, and use wet-scraping methods or plastic containment sheeting to keep dust and chips out of the soil and off your skin. Dry sanding old paint without confirming it’s lead-free isn’t a shortcut worth taking.
Choosing between oil-based and shellac-based primer usually comes down to the substrate. Bare cedar or redwood benefits from an oil-based primer that seals in natural tannins before they bleed through your topcoat. For smoke damage, water stains, or a wall that’s bled through paint before, shellac wins. Either way, never skip primer on bare wood. It’s the coat that actually bonds to the substrate; the topcoat is just riding on top of it.
Step-by-Step Sequence to Fix Peeling Exterior Paint
Here’s the full workflow, in order. Skipping steps is how a one-day touch-up turns into a three-year problem.
- Stop the water first. Fix or reseal any obvious leak source you found during diagnosis. Clean gutters, reseal window flashing, redirect downspouts. Give it a dry stretch of weather before moving on.
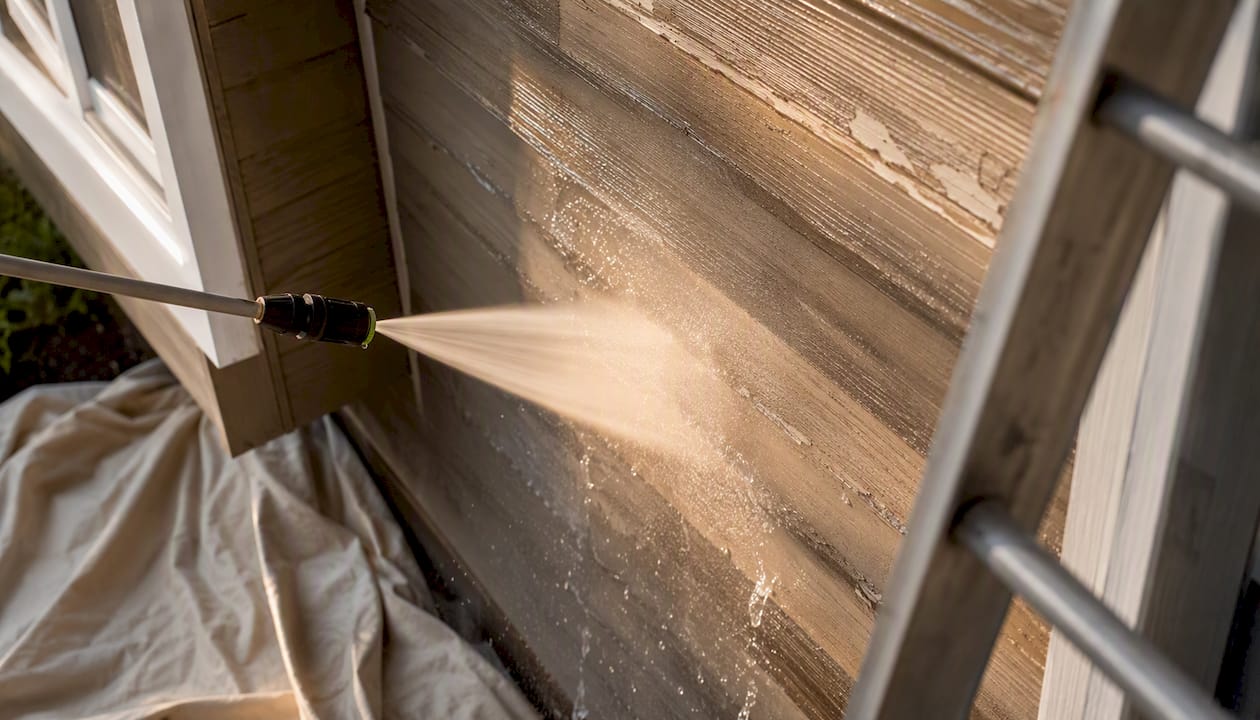
- Pressure wash the surface. Use 1,200 to 1,500 PSI with a 25 to 40-degree nozzle, spraying downward and never straight into siding joints. For mildew, a 1:3 bleach-to-water rinse works well. Let the wall dry a minimum of 48 hours before doing anything else, since trapped moisture under fresh paint just restarts the whole cycle.
- Scrape off every bit of loose paint. Work the scraper at a low angle and stop where the paint is genuinely sound; you’ll feel the edge go from crumbly to solid. Never paint over anything that flakes when you press a fingernail into it.
- Sand and feather the edges. Move through 80, then 120, then 220-grit sandpaper until you can’t feel the transition between old paint and bare wood. Scuff any glossy, intact paint nearby with 100-grit so the new coat has something to grip.
- Repair the substrate. Fill gouges and soft spots with exterior wood filler or epoxy, then spot-prime the filled areas once cured. If you find rot deeper than a quarter inch or soft wood that gives under thumb pressure, that’s a substrate replacement job, not a filler job.
- Caulk the joints. Use a 50-year urethane or hybrid caulk at trim, window, and siding joints, giving it full cure time per the label before priming over it.
- Prime all bare wood. Brush the primer on and back-brush it into the grain rather than just rolling over the surface; that mechanical push into the wood fiber is what actually creates a lasting bond. Tannin-rich woods get oil-based primer, heavy staining gets shellac-based primer.
- Apply two full coats of 100% acrylic exterior latex. Let the first coat dry fully, usually four to six hours in good weather, before recoating. Stick to a temperature range of 50°F to 85°F and relative humidity between 40% and 70% — paint applied outside that window struggles to form a proper film and peels again within a year or two.
A single-wall spot repair, from pressure wash to final coat, usually spans two to three days once you factor in drying time between steps. A full elevation repaint, including scraping, priming, and two coats, typically runs a full week for one side of a house, longer if rot repair or extensive caulking is involved.
Pro Tip: Never rush the drying window between pressure washing and priming. A wall that looks dry on the surface can still be holding moisture in the wood fiber underneath, and priming over that moisture is one of the most common reasons a “fixed” section peels again within a year.
When Should You Strip Everything or Call a Pro?
Some peeling problems are a Saturday project. Others need a specialist, and knowing the difference before you start saves you money and a wasted weekend.
- The tape-pull test lifts paint down to bare wood across a wide area, not just one small patch — that usually means the whole surface has lost adhesion, not just a corner of it.
- You find extensive wood rot, especially near the foundation, window sills, or roofline.
- There’s active water entry from a roofing, flashing, or plumbing issue rather than a simple caulk gap.
- Multiple areas fail the plastic-sheet test, pointing to a structural moisture problem rather than a localized leak.
- You suspect lead paint on a pre-1978 home and don’t have the equipment for safe containment.
If you’re dealing with repeated failures after a DIY attempt, or the scope has grown into full-elevation stripping, bringing in a professional gets you a proper moisture-meter reading, a real substrate evaluation, and often a warranty on the finished work. Before that visit, take clear photos of the worst peeling areas, note where and when it started, and mention any recent roof, gutter, or plumbing work. A good contractor will run the same tape and plastic tests you just learned, then give you a written scope before quoting the job.
How Do You Prevent Peeling from Coming Back?
A repaint that’s actually done right, with proper prep and the right primer, should hold for seven to ten years on well-maintained wood siding, less in high-UV climates or on south and west-facing walls. Getting there means a short annual routine, not another big project.
- Walk the perimeter every spring and check gutters, downspouts, and caulk joints for gaps or cracking.
- Inspect the roofline and gutters right after winter, when ice and debris do the most damage.
- Keep siding at least 6 inches above grade and extend downspouts at least 4 feet away from the foundation.
- Confirm bathroom, kitchen, and dryer vents actually terminate outside, not into an attic or soffit space.
- Avoid painting in direct, blazing sun or right before a forecasted cold snap; both conditions compromise film formation.
Pro Tip: Check your east and north-facing walls and the areas directly under gutters first every spring. They trap moisture longer than the rest of the house and almost always show trouble before anywhere else does.
What Does the Research Say About Painting Conditions and Prep?
The 12-inch plastic-sheet test from NRC Canada remains the clearest way to separate a surface-level peeling problem from one driven by moisture moving through the wall. A positive result changes your whole repair sequence: you fix the moisture source first, wait for the wall to dry out fully, and only then move to scraping and repainting.
Preparation quality outweighs almost every other variable in whether a repaint lasts. Forest Products Laboratory research and industry guidance consistently point to feathering, cleaning, and removing every trace of failing film as the dominant factor in long-term adhesion, more so than the brand or price point of the paint itself. The tape-pull test gives you a fast, on-the-spot way to confirm a given patch is ready before you commit a full day to priming and painting it.
Environmental conditions matter almost as much as prep. A working range of 50°F to 85°F and 40% to 70% relative humidity gives acrylic latex enough time to coalesce into a proper film before dew point or heat interferes with the process. Painting outside that window is one of the fastest ways to get blistering within the first season.
Different substrates call for different primers, and matching them correctly avoids a repeat of the same failure:
| Substrate Type | Recommended Primer |
|---|---|
| Bare cedar or redwood | Oil-based primer (or shellac-based for heavy tannin staining) |
| Chalky, weathered old paint | Bonding or sealer primer |
| Cementitious surfaces (stucco, fiber cement) | Alkali-resistant acrylic primer |
| Smoke or water-stained wood | Shellac-based primer, such as Zinsser BIN |
A publisher’s take on DIY versus hiring it out
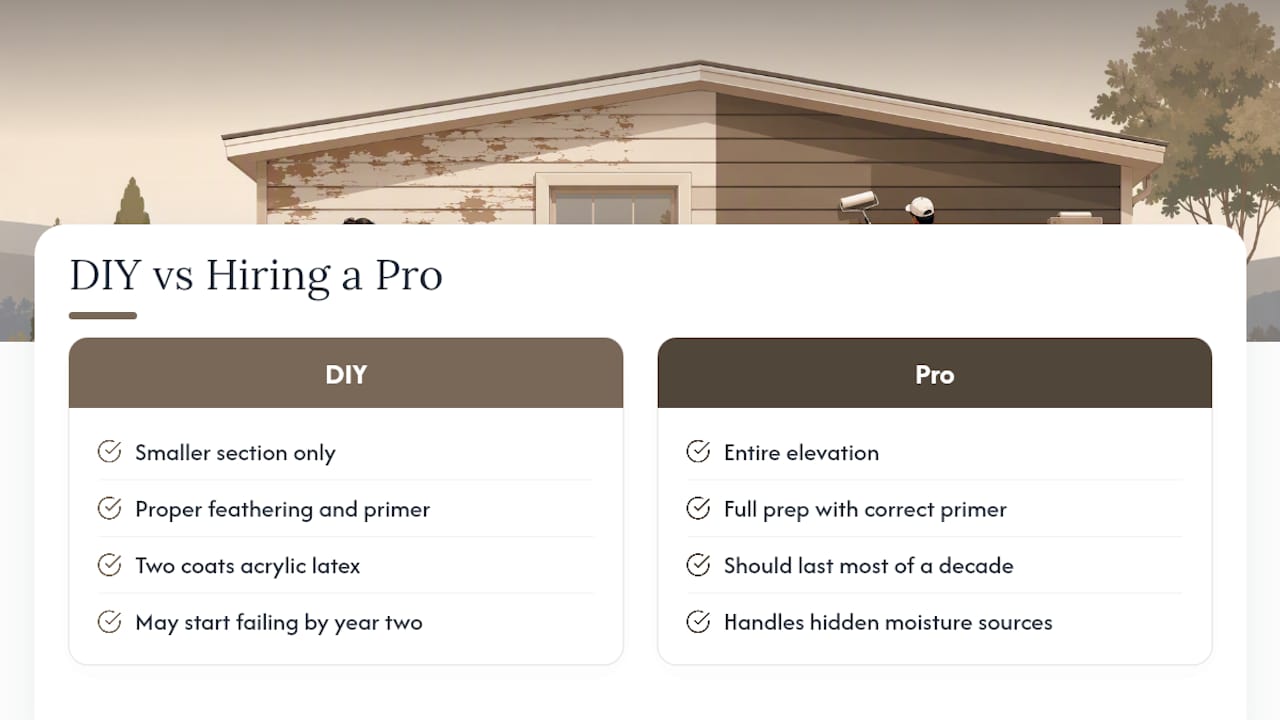
Homeowners tend to spend most of their energy picking the perfect paint color and rush through scraping and sanding, which is backward. The paint itself is rarely the reason a repair fails within two years; the prep underneath it is.
We’d rather see a homeowner do a smaller section correctly, with real feathering and a proper primer, than an entire elevation done fast. A rushed repaint might look fine at the six-month mark and start failing again by year two. A repair done with full prep, the right primer for the substrate, and two coats of quality acrylic latex, applied in the right weather window, should reasonably last most of a decade on wood siding.
Where we draw the line for homeowners is moisture that’s coming from somewhere you can’t see, like behind flashing or inside a wall cavity. That’s not a paint problem anymore. It’s a diagnostic problem that benefits from a moisture meter and someone who’s seen a hundred versions of the same failure pattern. Sigma Painting’s exterior work in the Greater Toronto Area leans hard on that first inspection step for exactly this reason, because guessing at a moisture source wastes more money than the inspection itself ever costs.
When Is It Worth Calling in a Professional Painter?
If your walk-around turned up rot, a failed tape test across a wide area, or a moisture reading that won’t go away, that’s the point where a professional exterior inspection earns its cost. A proper inspection includes a moisture meter check at suspect areas, the same tape-pull and plastic-sheet tests you just ran, a review of flashing and gutter condition, a written substrate report, and a firm repair estimate before any work starts.

Sigma Painting handles exactly this kind of assessment across the Greater Toronto Area, and it’s the right call when moisture keeps coming back, rot shows up in more than one spot, or you’d simply rather have a warrantied finish than a second DIY attempt. Requesting a quote is straightforward: send a few photos of the worst areas, note when the peeling started, and mention any recent roof or gutter work. Most homeowners get a scoped estimate back within a couple of days. If you’re ready to get a professional look at your siding, start with Sigma Painting’s exterior painting services page to see what’s included and request your inspection.
Sources
- How to Fix Peeling Exterior Paint: Prep, Prime, and Repaint (2026)
- How to fix exterior paint peeling (Sherwin‑Williams)
- Why Is My Paint Peeling? - This Old House
- NCR-133 repainting procedures (Purdue Extension)
Recommended
- 5 Signs It’s Time to Repaint Your Exterior — GTA Painter’s Guide | Sigma Painting
- Exterior Paint Colours for Pickering Homes — Painter’s Guide | Sigma Painting
- How to Choose a Painting Contractor: A Homeowner’s Checklist | Sigma Painting
- Exterior Painting Pickering & Durham Region GTA | Sigma Painting


