Paint bubbling on walls is the paint film lifting away from the surface because air, solvent vapor, or moisture is trapped underneath. The industry term is “blistering,” and it is a symptom, not a product defect. Before you reach for a scraper, stop what you are doing and diagnose the cause. Repainting over bubbles without fixing the root problem guarantees the same result within weeks.
Immediate actions to take right now:
- Stop painting or exposing the area to moisture and heat
- Pop one small blister with a utility knife and check the substrate: wet means active moisture, dry means heat or solvent
- Photograph the damage and note the location (bathroom, exterior wall, sun-facing side)
- Place drop cloths to contain debris and plan your diagnosis before touching anything else
Benjamin Moore’s troubleshooting guidance and Sherwin-Williams’ blistering repair guide both make the same point clearly:
“Repainting without addressing the underlying cause of blistering will result in the problem recurring.” — Benjamin Moore Troubleshooting Guidance
Key Takeaways
Paint bubbling on walls is always a symptom of a root cause: fix the moisture, prep failure, or application error first, or the bubbles will return.
| Point | Details |
|---|---|
| Diagnose before repairing | Pop a blister to check for wet or dry substrate; the answer determines the entire repair approach. |
| Moisture is the top cause | Active leaks, high humidity, and failed caulk or flashing drive most cases of paint blistering. |
| Prep and primer are non-negotiable | Double-rinse after TSP, prime bare surfaces, and follow recoat windows to prevent recurrence. |
| Know when to call a pro | Recurring bubbles, mold, large areas, or hidden leaks require professional diagnosis and repair. |
| Sigma Painting for GTA homeowners | Sigma Painting provides professional diagnosis, premium prep, and warranty-backed results for interior and exterior blistering repairs across the Greater Toronto Area. |
Table of Contents
- What causes paint bubbling on walls?
- How to diagnose which type of blister you have
- How to prevent paint bubbling on your next project
- When you should hire a professional painter
- The part most guides skip about paint blistering
- Sigma Painting handles what DIY can’t
- Useful sources and further reading
What causes paint bubbling on walls?
Paint bubbles form when something breaks the bond between the paint film and the surface beneath it. There are five main mechanisms, and knowing which one you are dealing with changes everything about the fix.
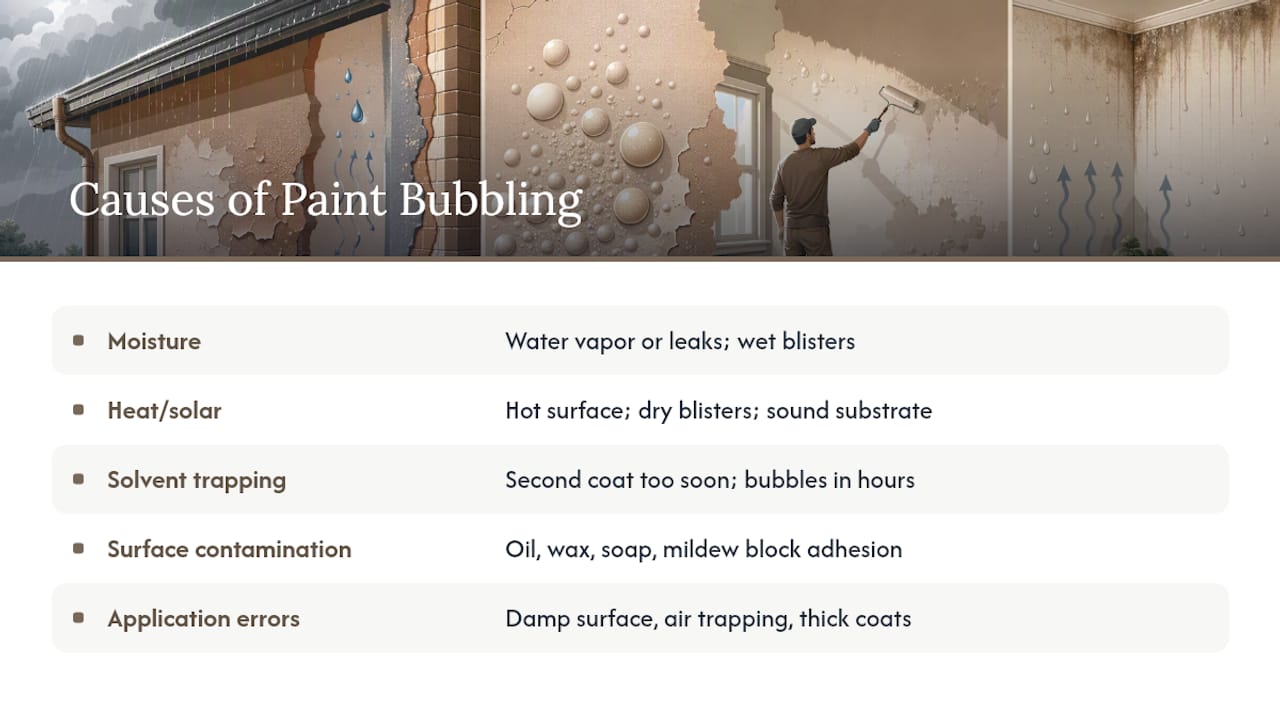
Moisture is the most common driver. Water vapor migrating through a wall, an active leak from a roof or pipe, or high indoor humidity during application all push moisture into the paint film before it can cure. When you pop a moisture blister, the substrate underneath is often damp or stained. Bathrooms, kitchens, and exterior walls near gutters are the usual suspects.
Heat and solar blistering happen when paint on a hot surface skins over on the outside before the solvent underneath has escaped. The trapped solvent expands and pushes the film outward. South-facing siding in summer is a classic location. These blisters are dry when popped, and the substrate is completely sound.
Solvent trapping is a close cousin of heat blistering. Apply a second coat before the first has fully cured, and the outgassing solvent from the lower layer has nowhere to go. The bubbles appear within hours to days of painting and are concentrated wherever the first coat was thickest.
Surface contamination is underestimated. Oil, wax, soap residue, mildew, or chalky old paint all prevent adhesion. The new coat bonds to the contaminant rather than the wall, and blisters follow. Applying latex paint directly over an oil-based coat without proper priming creates the same failure.
Application errors round out the list: painting on a damp surface, rolling too fast (which introduces air), applying coats too thick, or using the wrong roller nap for the texture. Each of these traps something under the film.
“Wet blisters indicate active moisture infiltration; dry blisters point to heat, solvent, or adhesion failures. The distinction determines which primer and repair approach to use.” — Sherwin-Williams Blistering Repair Guide
How to diagnose which type of blister you have
A quick, stepwise check takes about 15 minutes and tells you exactly what you are dealing with.
- Note when the bubbles appeared. Hours to days after painting points to solvent trapping or heat. Weeks to months later, especially after rain or a humid season, points to moisture migration or a hidden leak.
- Check the location. Bubbles on a sun-exposed wall only: suspect solar blistering. Near a bathroom ceiling or below a window: humidity or a plumbing leak. Along a foundation or below a gutter line: water infiltration from outside.
- Pop a blister with a utility knife. Wet or stained substrate underneath means active moisture. Dry, clean substrate means heat, solvent, or a contamination-based adhesion failure.
- Measure humidity. A basic hygrometer (available for roughly $10–$20) tells you whether indoor relative humidity is above 50%, which is high enough to cause problems during application and drying.
- Inspect the building envelope. Check gutters, flashing, caulking around windows and doors, and any roof penetrations. Paint bubbling after rain on an exterior wall almost always traces back to failed flashing, cracked caulk, or clogged gutters letting water behind the siding.
- Look for staining patterns. A rust-colored ring or tide mark around a blister is a strong indicator of a slow, recurring leak rather than a one-time humidity spike.
Quick reference by scenario:
- Bathroom ceiling blisters: inadequate exhaust fan ventilation or a plumbing leak above
- Exterior wall blisters after rain: water entry through failed caulk, flashing, or gutters
- South-facing siding blisters in summer: solar/heat blistering, dry substrate underneath
- Blisters appearing hours after a second coat: solvent trapping from premature recoating
Paint bubbles are rarely a failure of the paint itself. They almost always reveal a moisture or prep problem the homeowner did not know was there.
How to prevent paint bubbling on your next project
Prevention comes down to four areas: environment, surface prep, materials, and technique.
Environment checklist before you start:
- Temperature: 50°F–90°F for most latex paints; check the product label for the specific range
- Relative humidity: below 50% is ideal; above 70% significantly slows drying and risks blistering
- Avoid painting in direct sunlight on hot surfaces; plan exterior work for early morning on shaded walls
- Do not paint if rain is forecast within 24 hours, or if dew is expected overnight
Surface prep checklist:
- Clean with detergent, rinse, then follow with a solvent rinse as the manufacturer recommends
- Remove all chalky or peeling paint before applying anything new
- Sand glossy surfaces to give the new coat something to grip
- Always prime bare drywall, raw wood, or porous masonry
Tools and technique:
- Match roller nap to surface texture: 3/8" for smooth walls, 1/2"–3/4" for textured or rough surfaces
- Stir paint slowly; do not shake it, which introduces air bubbles
- Apply thin, even coats; avoid overworking wet paint
- Follow recoat windows strictly, and allow full cure (typically 30 days for latex) before heavy cleaning or scrubbing
Home systems to maintain:
- Clean gutters at least twice a year to prevent water backup against the fascia
- Inspect and re-caulk around windows, doors, and penetrations every 2–3 years
- Confirm that bathroom and dryer exhaust fans vent to the outdoors, not into the attic
- Run a dehumidifier in basements during humid months and during any interior painting project
| Prevention Factor | What to Do | Why It Matters |
|---|---|---|
| Temperature | Paint between 50°F and 90°F | Outside this range, paint skins before solvents escape |
| Humidity | Keep RH below 50% during application | High humidity slows drying and traps moisture under the film |
| Surface cleanliness | Double-rinse after TSP wash | Soap residue causes new blisters |
| Primer | Always prime bare or porous surfaces | Skipping primer is a leading cause of adhesion failure |
| Recoat timing | Follow manufacturer’s recoat window | Premature topcoating traps solvent from the layer below |
| Building envelope | Maintain caulk, gutters, and flashing | Most exterior bubbling traces back to water entry, not paint failure |
For exterior projects, painting temperature guidance is worth reviewing before you schedule the work, since surface temperature and air temperature can differ significantly on a sunny day.
When you should hire a professional painter
Some situations are genuinely beyond a DIY fix, and pushing through them usually costs more in the long run.
Hire a pro when:
- Bubbles return after a DIY repair (active moisture is still present)
- The affected area is larger than a few square feet
- You find mold, soft drywall, or structural damage behind the paint
- The location is inaccessible (high exterior walls, vaulted ceilings)
- The surface has a texture you cannot match yourself
Professionals bring diagnostic tools and experience that change the outcome. They can identify hidden water intrusion with moisture meters, replace damaged substrate, match existing textures, and apply primers and coatings with the right equipment. They also provide a written scope and, from reputable contractors, a warranty on the work.
“A professional who cannot explain what caused the blistering before they start scraping is not diagnosing the problem — they are just painting over it.” — Contractor guidance via Sherwin-Williams
Red flags when hiring:
- Vague diagnosis (“it just needs a fresh coat”)
- No written scope, timeline, or product specifications
- No mention of drying times, primer selection, or manufacturer guidelines
- A bid significantly lower than others that skips prep line items
For drywall repair that accompanies a paint repair, confirm the contractor specifies the repair method and the primer they will use over the patch before the topcoat goes on.
Practical next steps: document the damage with photos, get two written estimates, ask each contractor which primer and topcoat they plan to use and why, and confirm the warranty and cleanup terms in writing. A painting contractor checklist helps you ask the right questions before signing anything.
The part most guides skip about paint blistering
The conventional advice on paint bubbling is technically correct but practically incomplete. Every guide tells you to fix the source, prep the surface, and prime before repainting. What they rarely say is that the most expensive mistake is not skipping the primer. It is skipping the diagnosis.
Homeowners routinely spend a weekend scraping, patching, and repainting a bathroom ceiling, only to see bubbles return within a month. The patch looked fine. The primer was right. The paint was quality. But the exhaust fan was venting into the attic instead of outside, and nobody checked. The moisture source was never addressed because nobody looked for it.
The same pattern plays out on exterior walls. A south-facing wall blisters after a wet spring, the homeowner scrapes and repaints, and the bubbles come back the following fall. The caulk around the window above it had failed years earlier, and every rain event was pushing water behind the siding. The paint was never the problem.
What this means practically: before you buy a scraper, spend 20 minutes with a flashlight, a utility knife, and a hygrometer. Check the gutters. Look at the caulk. Run the bathroom fan and see where the air goes. That 20 minutes is worth more than any primer on the market, because no coating system survives an active water source.
The other thing worth saying: not every bubble requires a full strip and repaint. A small, isolated blister on a dry substrate in a low-humidity room is a straightforward patch. But if bubbles cover more than a few square feet, keep coming back, or appear alongside soft drywall or discoloration, the repair has crossed into territory where a professional diagnosis pays for itself.
Sigma Painting handles what DIY can’t
When the diagnosis points to hidden moisture, large affected areas, or a finish that needs to match perfectly, the repair goes beyond what a weekend and a hardware store run can deliver.

Sigma Painting specializes in interior painting services and exterior painting across the Greater Toronto Area, with a process built around the prep work that prevents blistering from coming back. Every project starts with a proper surface assessment, manufacturer-specified primers, and application conditions that meet product requirements. For homeowners dealing with water-damaged walls or ceilings, Sigma Painting also provides water damage repair services that address the substrate before a single drop of paint goes on.
If you are not sure whether your situation calls for a DIY patch or a professional repair, use the instant quote calculator to get a fast estimate and connect with the team.
Useful sources and further reading
- Blistering Paint Bubbling Paint Help | Benjamin Moore
- How to Fix Paint Blistering | Sherwin‑Williams
- Why Is My Paint Bubbling and How Do I Fix It? | The Family Handyman
- How to Fix Paint Bubbling and Blistering (and Stop It Coming Back) — CompositePaint
- Paint Bubbling on Exterior Wall After Rain — ClearlyLearned
- EPA — Lead